Lab 8: Integrating with Oracle E-Business Suite
Overview
Anypoint Connector for Oracle E-Business Suite (Oracle EBS Connector) provides real-time connectivity to query and update Oracle EBS using web services and message queues. The connector has been developed for the Oracle EBS v12.2.x.
Oracle EBS Connector provides integration to the following:
-
Financial Management and Order Management Modules: Full API coverage for Financials and Order Management services
-
PL/SQL Integration: Both standard PL/SQL or user-defined PL/SQL can be invoked
-
XML Gateway: Inbound and Outbound, to send and receive message to and from EBS
-
Business Events: The ability to receive messages when an event is fired in EBS, via the
WF_JMS_JMS_OUTtopic, also supports user defined business events
How the connector works:
Oracle EBS offers different technologies or products to address various types of integrations. The most widely used technologies for integration with enterprise applications includes:
-
Data-centric integration
-
Event-driven integration using Oracle Business Event System and XML Gateway queues
-
Integration through Web Services using Oracle E-Business Suite Integrated SOA Gateway (ISG)
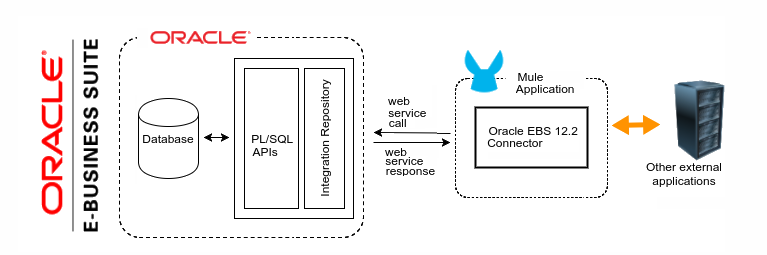
We need to set up the Oracle EBS site integration gateway for the connector to connect to EBS. First we need to setup the Integration Repository (for some services the integration repository might not be setup or partially setup for eg: Order Management)
The Oracle EBS contains two type of connectors as given below:
-
PL/SQL Rest Service
-
Business event source
In Module 1 Lab 3, we learned about Anypoint Exchange and the benefits that it provides to your organization by making collaboration easier. It allows your developers to easily save, discover, and reuse APIs and integration assets.
Additionally we also learned about the API Design / API Specification of the Oracle EBS System API via the asset published in Anypoint Exchange. In this lab we’re going to take the API specification and learn about the following:
-
Use Anypoint Studio to implement the Oracle EBS System API using the specification published in Anypoint Exchange.
-
Build and run the implementation locally in Anypoint Studio with the built-in Mule Runtime.
-
Leverage an example of the completed Oracle EBS System API project and publish an instance to CloudHub.
Step 1: Create a new Mule project from the API specification
In this step we will create a new Mule application in Anypoint Studio from the Oracle EBS System API specification that has already been defined and published into Anypoint Exchange.
These steps are for workshop attendees using the Remote Desktop that was provisioned. You can also run these steps on your own local instance of Anypoint Studio. Some screenshots may differ due to differences in Anypoint Studio versions. |
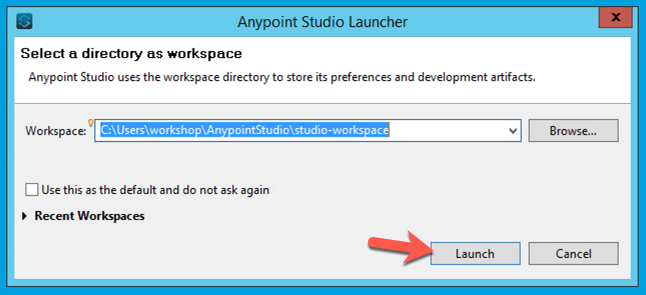
Start Anypoint Studio by double-clicking on icon on the desktop.
In the Anypoint Studio Launcher, keep the default Workspace location and click on Launch
-
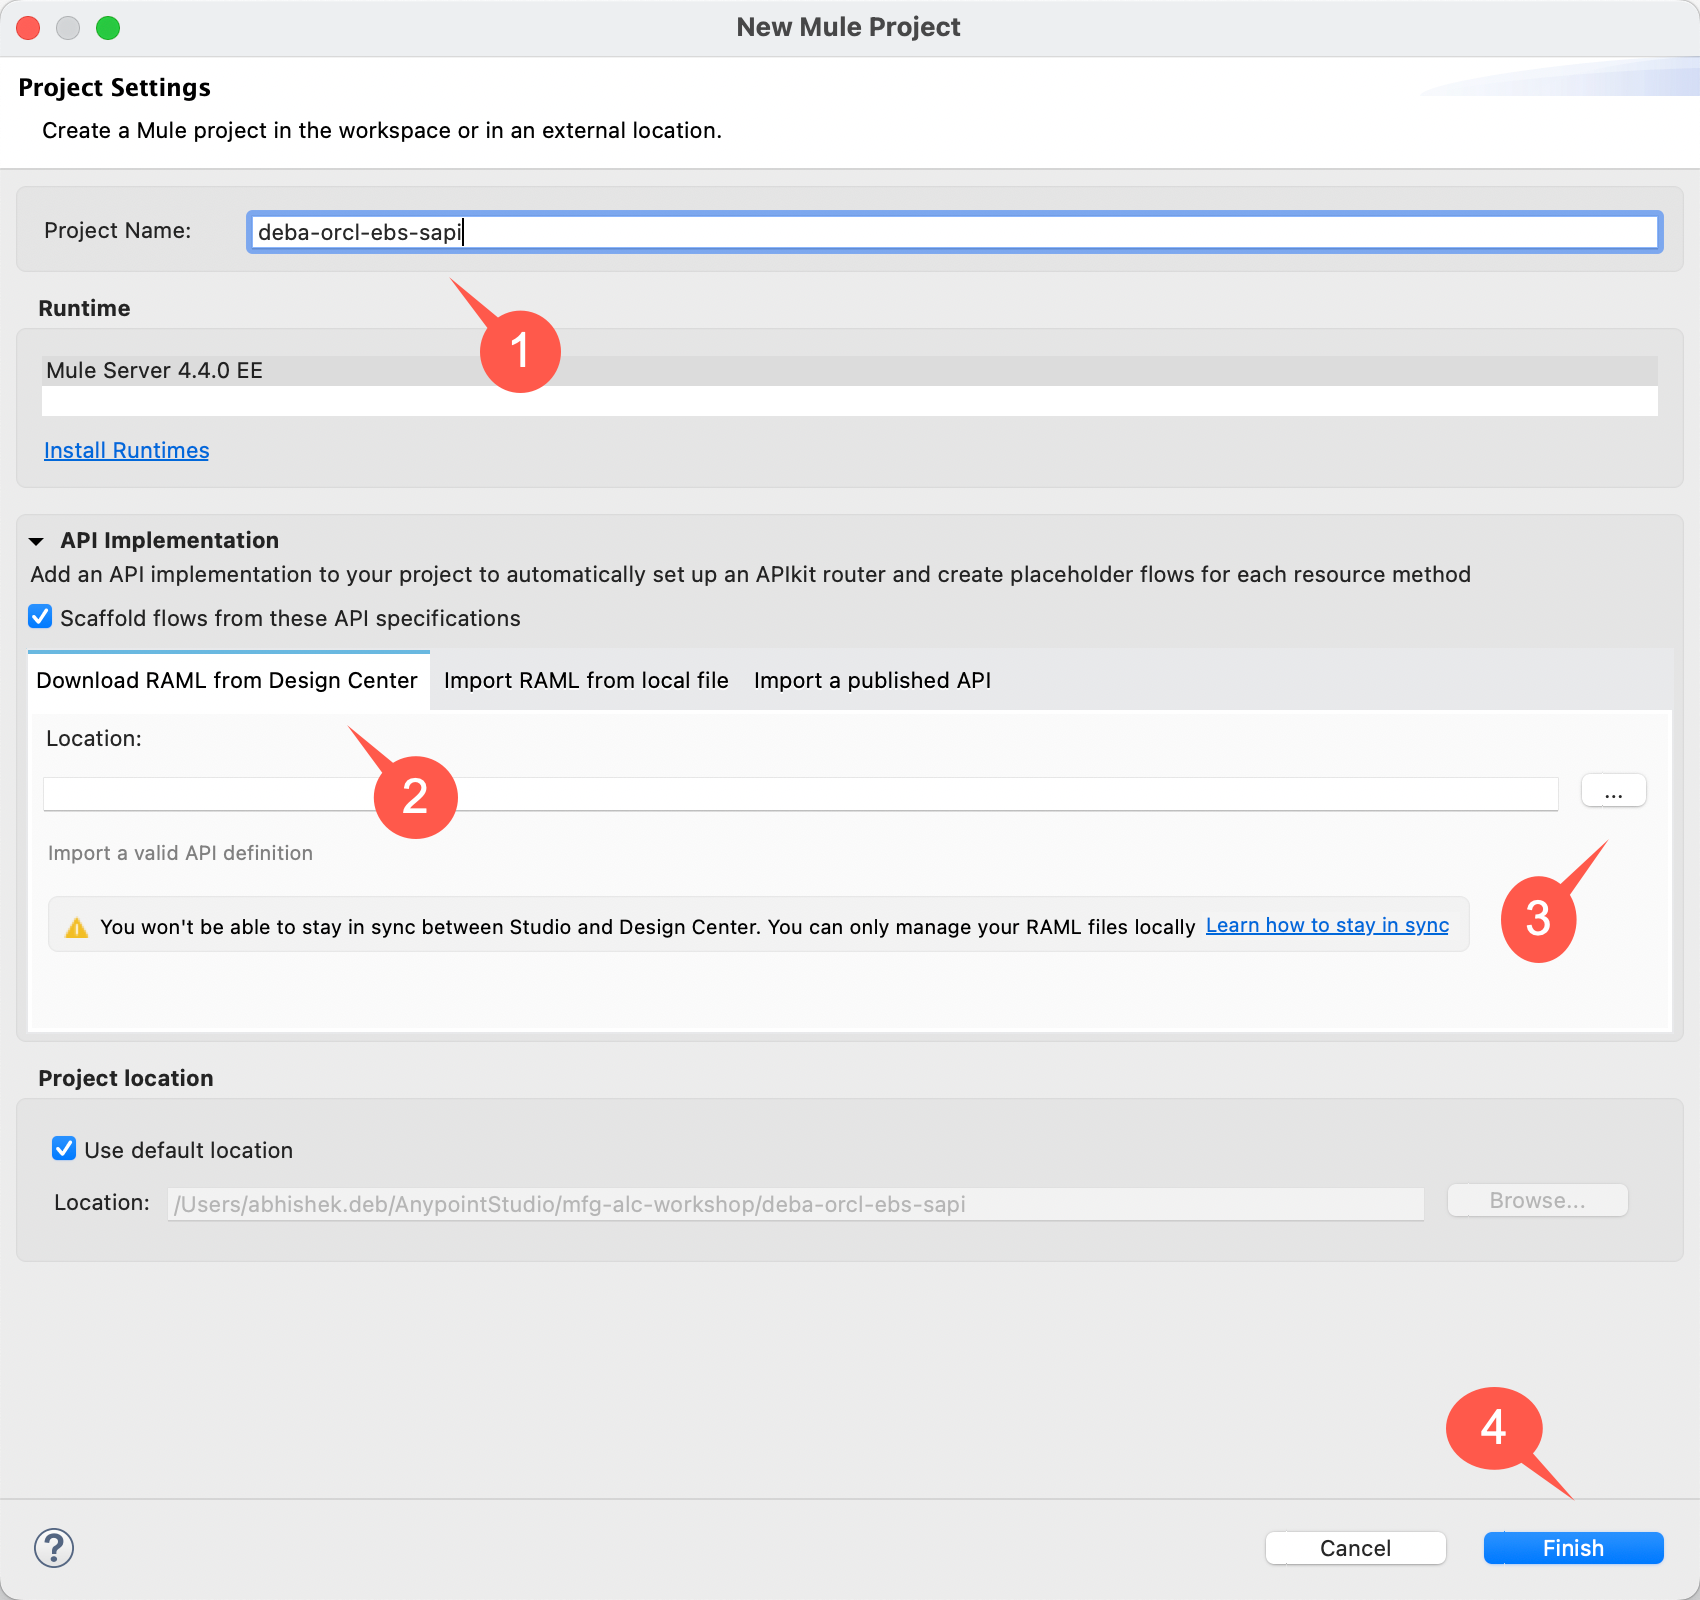
From the Anypoint Studio menu, select File > New > Mule Project to create a new project. A window will pop-up where you can define the details of this new application.
Give your project a name like the following:
Project Name: <username>-orcl-ebs-sapi Under the API implementation section, click on the Download RAML from Design Center tab and click on the button next to the Location field.
It should take you to the Browse Design Center for APIs window. If it asks you to login, use the Anypoint Platform account that was provisioned for this workshop.
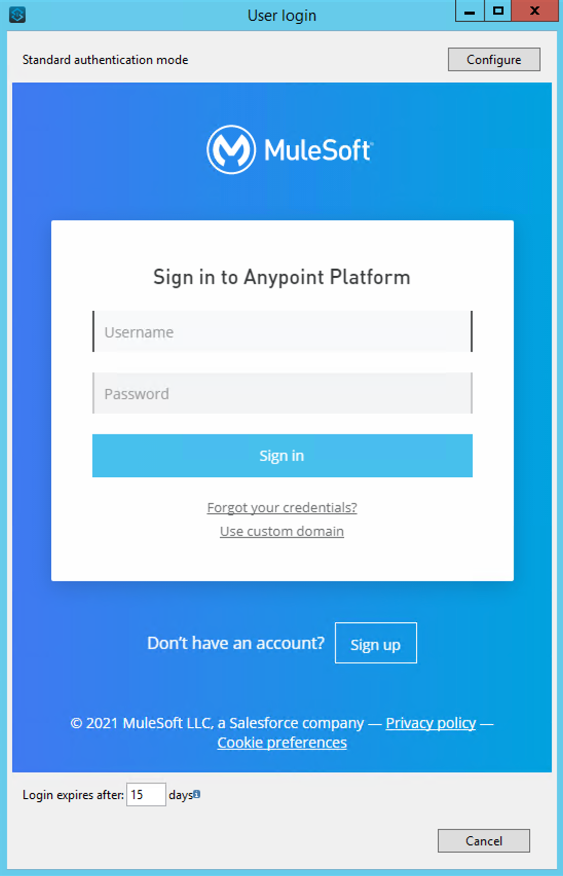
Type in the login credentials for the Anypoint Platform and click Sign In

In order to select Oracle EBS asset from Anypoint, please type in Oracle EBS for the system API asset to appear in the window for selection. Once you can see the asset, select it by clicking on the Add button. The asset should move to the right side of the window under Selected Modules
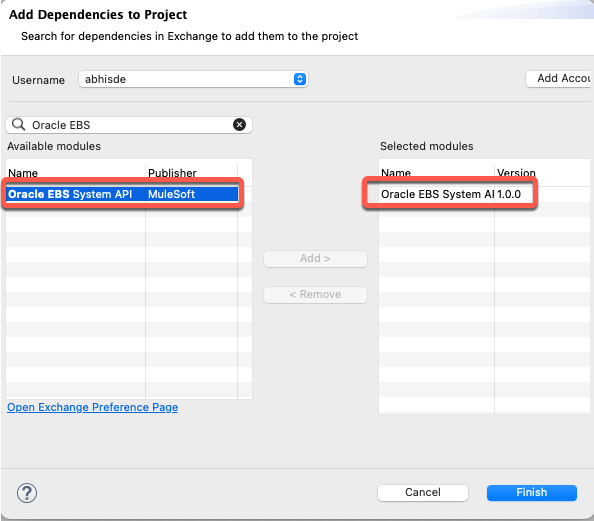
Click Finish
The Mule Project page should select the API asset we selected earlier, please note if the Scaffold flows from these API specifications is checked. If unchecked, please check this checkbox.
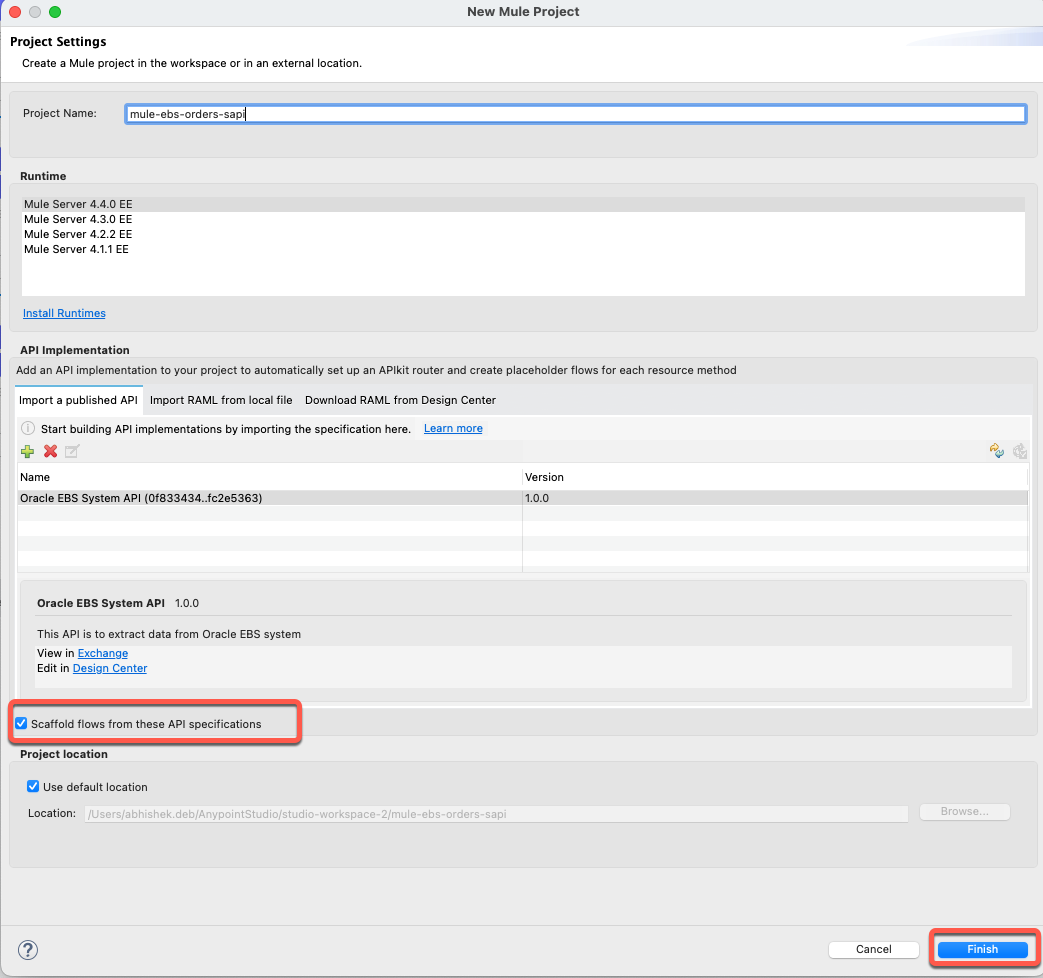
Click Finish
Note the new project is automaticaaly scafolded in the Studio.
Notice the flows created in the Studio. Compare this with the Asset present in the Exchange for Oracle EBS System API. You will notice the flows are similar to the methods in the API Specification.

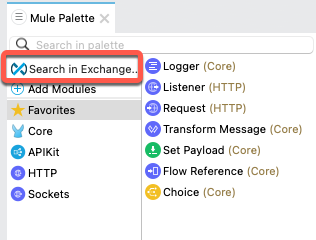
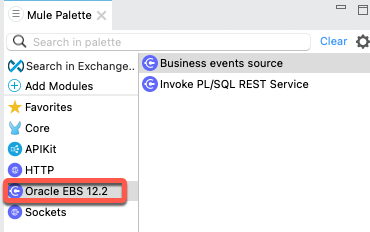
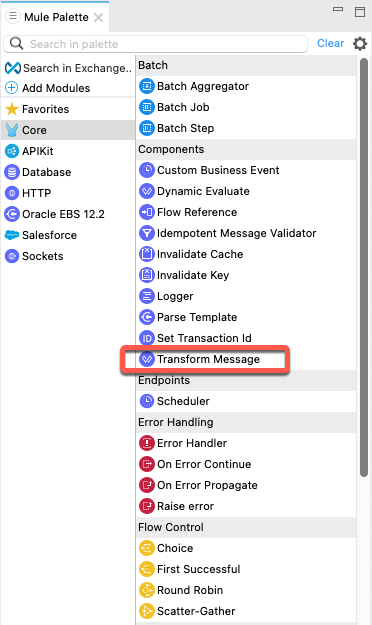
Now go to Mule Palette and click Search in Exchange
A window pops up and type Oracle EBS connector and select Oracle E-Business Suite (EBS) 12.2 from the options and click on Add
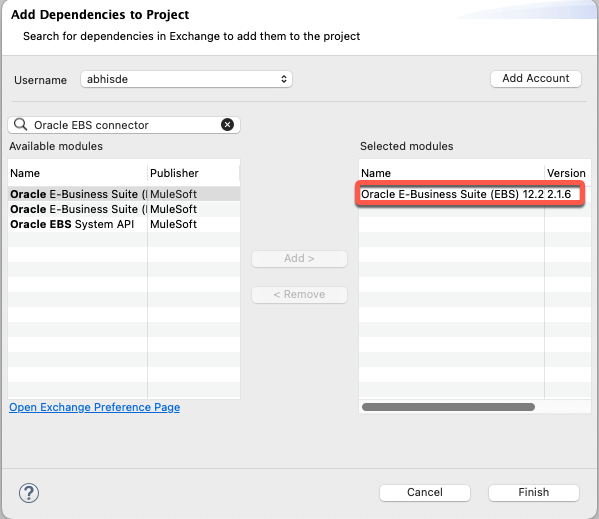
Click on Finish
The connector should be loaded into the palette. Check the two options provided.
Now let’s start building the implementation.
Step 2: Build Implementation from API Specification
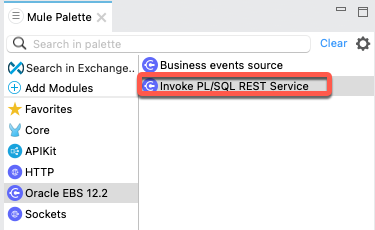
Now since we have the EBS 12.2 connector is downloaded, we need to create the actual implementation. Let’s focus on getting Orders details from Oracle EBS instance based on the Order numbers as input.
Select the EBS 12.2 connector and select the Invoke the PL/SQL Operation and drag it into the flow between the two Transform Message in the flow.
The final flow is as shown below:

Now Select Invoke PL/SQL REST Service the window should appear below the implementation flow.
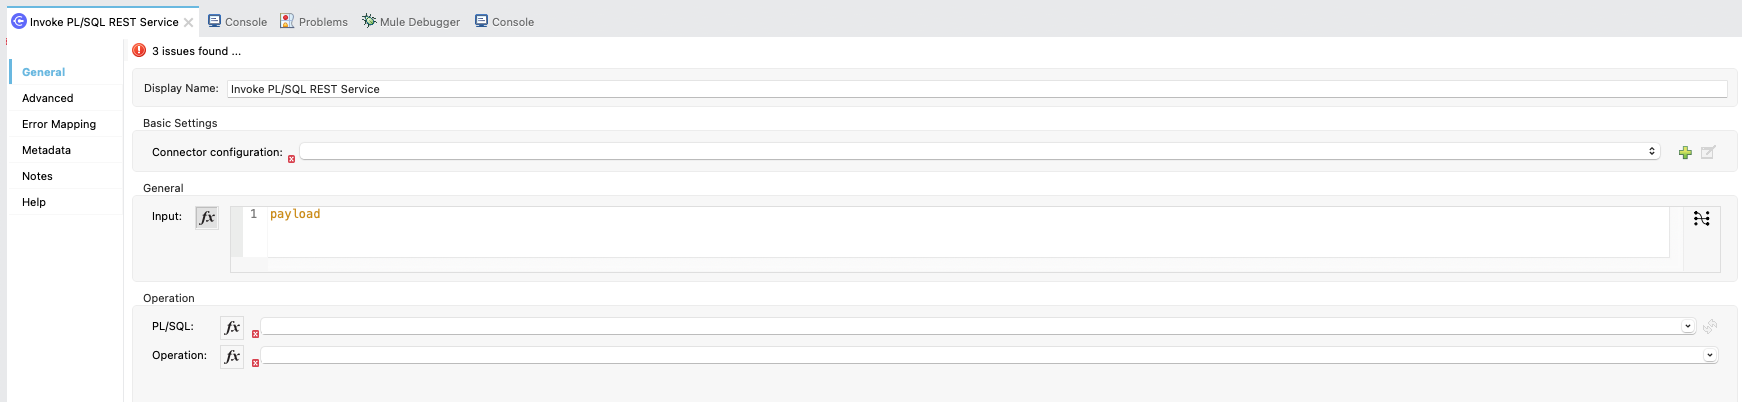
Click on the button as shown below.

A window will appear for the EBS 12.2 connector settings.
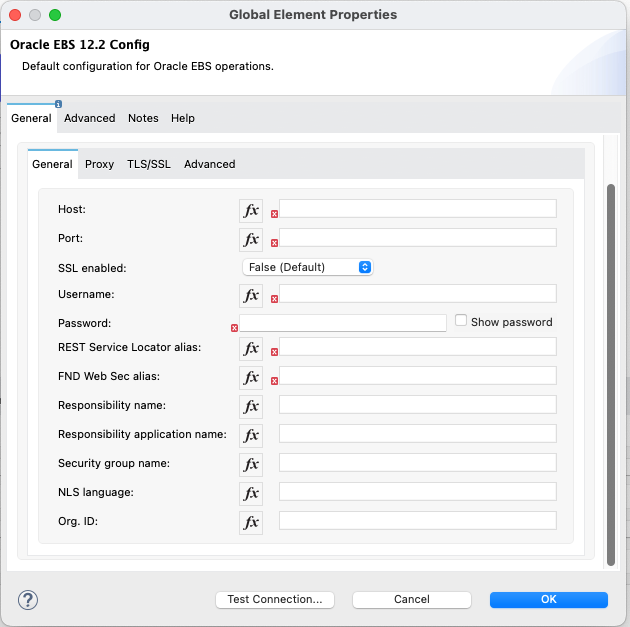
Enter the below values
  Host: "ebs.demos.mulesoft.com"
  Port: "8000"
  Username: "OPERATIONS"
  Password: "MuleDemo21!"
  REST Service Locator alias: "ebsRestService"
  FND Web Sec alias: "fnd_web_sec"
  Responsibility Name: "ORDER_MGMT_SUPER_USER"
  Responsibility Application Name: "ONT"
  Security Group Name: "STANDARD"
  Org. Id: "204"
Click OK
Now select the values from the dropdown list as below. If the dropdown is taking time to load. Please copy the below values.
PL/SQL: salesOrdersServices
Operation: GET_ORDER

| Please select the PL/SQL value and then select the Operation. |
Connector should be ready now. Let us modify the input values for the connector.
Select the Transform message before the connector and clear the payload. Copy paste the below code.
%dw 2.0
output application/xml
ns ns0 http://xmlns.oracle.com/apps/ont/rest/salesOrdersServices/get_order/
---
{
	ns0#InputParameters: {
		ns0#P_API_VERSION_NUMBER: "1.0",
		ns0#P_INIT_MSG_LIST: "T",
		ns0#P_RETURN_VALUES: "T",
		ns0#P_ORDER_NUMBER: attributes.uriParams.'order_ID' as Number
	}
}
| Since the connector is calling the underlying SOAP package through the REST service the input parameter is XML. |
Select the Transform message after the connector and clear the payload. Copy paste the below code.
%dw 2.0
output application/json
ns ns0 http://xmlns.oracle.com/apps/ont/rest/salesOrdersServices/get_order/
---
{
	EBS_Integration_Method: "EBS 12.2 Connector",
	OrderNumber: payload.ns0#OutputParameters.ns0#X_HEADER_REC.ns0#ORDER_NUMBER,
	booked: payload.ns0#OutputParameters.ns0#X_HEADER_REC.ns0#BOOKED_FLAG,
	transactionalCurrCode: payload.ns0#OutputParameters.ns0#X_HEADER_REC.ns0#TRANSACTIONAL_CURR_CODE,
	orderTypeId: payload.ns0#OutputParameters.ns0#X_HEADER_REC.ns0#ORDER_TYPE_ID,
	priceListId: payload.ns0#OutputParameters.ns0#X_HEADER_REC.ns0#PRICE_LIST_ID,
	soldToOrgId: payload.ns0#OutputParameters.ns0#X_HEADER_REC.ns0#SOLD_TO_ORG_ID,
	customerPO: payload.ns0#OutputParameters.ns0#X_HEADER_REC.ns0#CUST_PO_NUMBER,
	description: payload.ns0#OutputParameters.ns0#X_HEADER_REC.ns0#ATTRIBUTE1,
	orderItems: payload.ns0#OutputParameters.ns0#X_LINE_TBL.*ns0#X_LINE_TBL_ITEM map ( xLINETBLITEM , indexOfXLINETBLITEM ) -> {
		inventoryItemId: xLINETBLITEM.ns0#INVENTORY_ITEM_ID default 0,
		lineTypeId: xLINETBLITEM.ns0#LINE_TYPE_ID default 0,
		paymentTermId: xLINETBLITEM.ns0#PAYMENT_TERM_ID default 0,
		unitSellingPrice: xLINETBLITEM.ns0#UNIT_SELLING_PRICE default 0,
		orderedQuantity: xLINETBLITEM.ns0#ORDERED_QUANTITY default 0,
		unitListPrice: xLINETBLITEM.ns0#UNIT_LIST_PRICE default 0,
		priceListId: xLINETBLITEM.ns0#PRICE_LIST_ID default 0,
		shipFromOrgID: xLINETBLITEM.ns0#SHIP_FROM_ORG_ID default 0
	}
}
Now Save the Project.
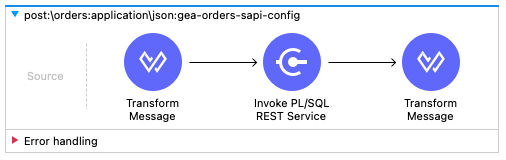
Now let’s setup the POST Order data into EBS.
Select post:\orders:application\json:gea-orders-sapi-config flow and select the Oracle EBS 12.2 connector Invoke PL/SQL REST service and drag and drop it to the flow as shown below.
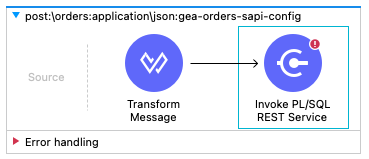
Notice, the connector is showing an red exclaimtion mark "!" on it. This is because we need to select the existing connector settings we had enabled earlier.
Click on the connector and a window will open as earlier when we were setting up the connector.
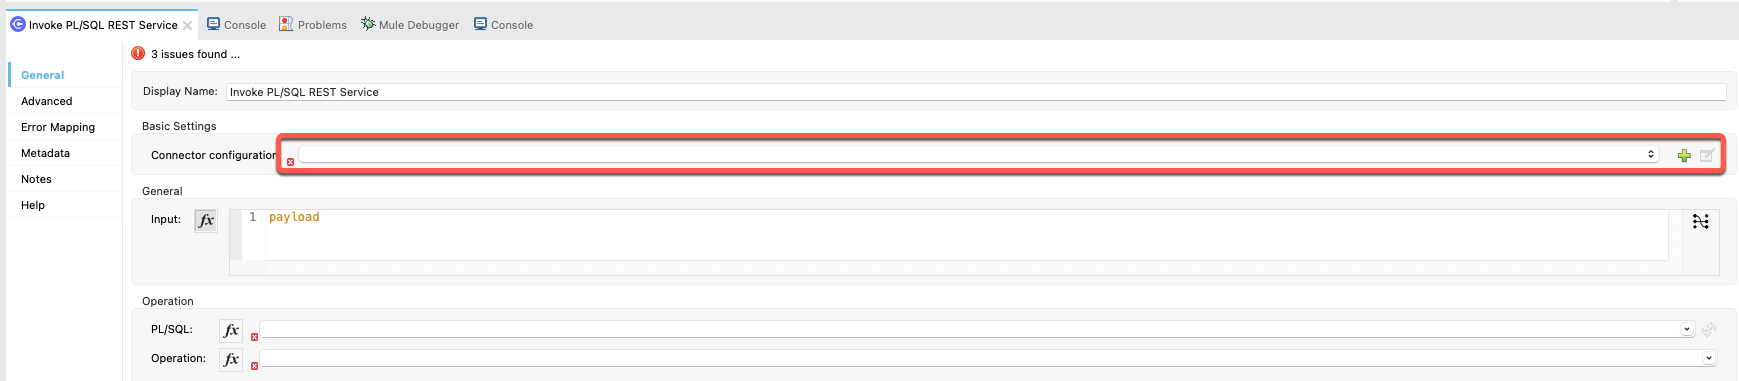
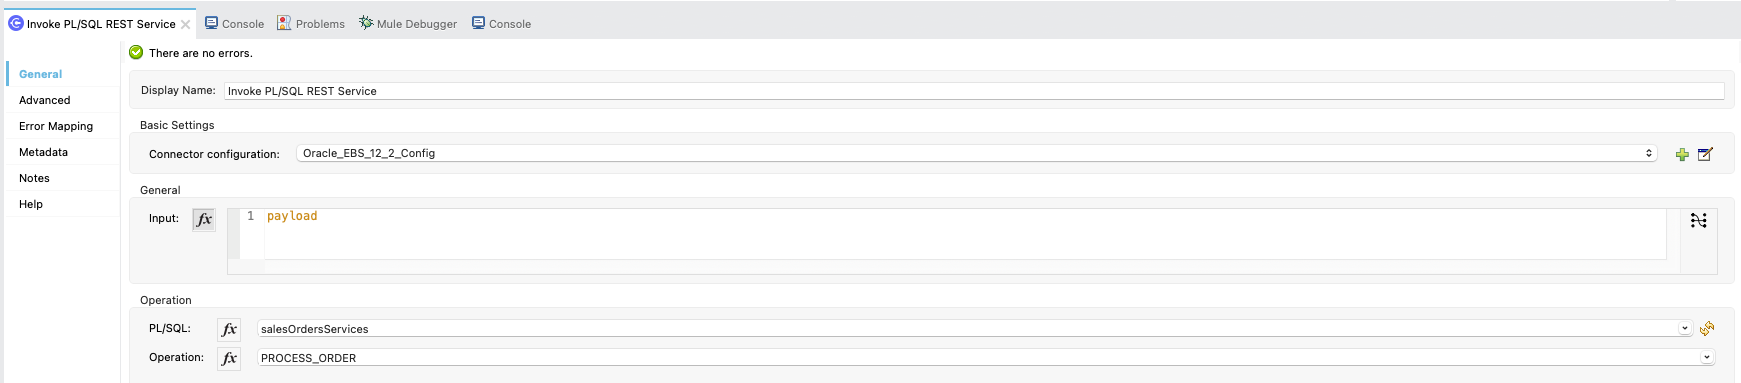
Now check the dropdown option values and select Oracle_EBS_12_2_Config.
Now select the PL/SQL and Operation values as below.
  PL/SQL: salesOrdersServices
  Operation: PROCESS_ORDER
| Please select the PL/SQL value and then select the Operation. |
Connector should be ready now. Let us modify the input values for the connector.
Select the Transform message before the connector and remove the payload. Copy paste the below code.
%dw 2.0
output application/xml
ns ns0 http://xmlns.oracle.com/apps/ont/rest/salesOrdersServices/process_order/
---
{
	ns0#InputParameters: {
		ns0#P_API_VERSION_NUMBER: "1.0",
		ns0#P_INIT_MSG_LIST: "T",
		ns0#P_RETURN_VALUES: "T",
		ns0#P_ACTION_COMMIT: "T",
		ns0#P_HEADER_REC: {
			ns0#ATTRIBUTE1: payload.description,
			ns0#BOOKED_FLAG: payload.booked,
			ns0#ORDER_TYPE_ID: payload.orderTypeId,
			ns0#ORG_ID: payload.orgId,
			ns0#PAYMENT_TERM_ID: payload.paymentTermId,
			ns0#PRICE_LIST_ID: payload.priceListId,
			ns0#SOLD_TO_ORG_ID: payload.soldToOrgId,
			ns0#TRANSACTIONAL_CURR_CODE: payload.transactionalCurrCode,
			ns0#OPERATION: "CREATE"
		},
		ns0#P_LINE_TBL: {
			(payload.orderItems map ( orderItem , indexOfOrderItem ) -> {
				ns0#P_LINE_TBL_ITEM: {
					ns0#INVENTORY_ITEM_ID: orderItem.inventoryItemId,
					ns0#LINE_TYPE_ID: orderItem.lineTypeId,
					ns0#ORDERED_QUANTITY: orderItem.orderedQuantity,
					ns0#PAYMENT_TERM_ID: orderItem.paymentTermId,
					ns0#PRICE_LIST_ID: orderItem.priceListId,
					ns0#UNIT_LIST_PRICE: orderItem.unitListPrice,
					ns0#UNIT_SELLING_PRICE: orderItem.unitSellingPrice,
					ns0#OPERATION: "CREATE"
				}
			})
		},
		ns0#P_RTRIM_DATA: "n"
	}
}
Now go to Mule Palette and select Core to select the Core Mule Palette values. Under Component select the Transform Message and drag it to the flow after the EBS 12.2 connector.
The final flow should look as below.
Select the Transform Message after the EBS connector clear the payload and paste the below code.
%dw 2.0
output application/json
ns ns0 http://xmlns.oracle.com/apps/ont/rest/salesOrdersServices/process_order/
---
{
	ReturnStatus: payload.ns0#OutputParameters.ns0#X_RETURN_STATUS default "",
	EBS_Header_ID: payload.ns0#OutputParameters.ns0#X_HEADER_REC.ns0#HEADER_ID as String default "",
	Order_Number: payload.ns0#OutputParameters.ns0#X_HEADER_REC.ns0#ORDER_NUMBER as String default "",
	Messages: payload.ns0#OutputParameters.ns0#X_MESSAGES.*ns0#X_MESSAGES_ITEM map ( xMESSAGESITEM , indexOfXMESSAGESITEM ) -> {
		messageText: xMESSAGESITEM.ns0#MESSAGE_TEXT default ""
	},
	PO_Number: payload.ns0#OutputParameters.ns0#X_HEADER_REC.ns0#CUST_PO_NUMBER default "",
	Invoice_To: {
		Org: payload.ns0#OutputParameters.ns0#X_HEADER_VAL_REC.ns0#INVOICE_TO_ORG default "",
		Address: payload.ns0#OutputParameters.ns0#X_HEADER_VAL_REC.ns0#INVOICE_TO_ADDRESS1 default "",
		City: payload.ns0#OutputParameters.ns0#X_HEADER_VAL_REC.ns0#INVOICE_TO_CITY default "",
		State: payload.ns0#OutputParameters.ns0#X_HEADER_VAL_REC.ns0#INVOICE_TO_STATE default "",
		Zip: payload.ns0#OutputParameters.ns0#X_HEADER_VAL_REC.ns0#INVOICE_TO_ZIP default "",
		Country: payload.ns0#OutputParameters.ns0#X_HEADER_VAL_REC.ns0#INVOICE_TO_COUNTRY default ""
	},
	Ship_To: {
		Customer: payload.ns0#OutputParameters.ns0#X_HEADER_VAL_REC.ns0#SHIP_TO_ORG default "",
		Address: payload.ns0#OutputParameters.ns0#X_HEADER_VAL_REC.ns0#SHIP_TO_ADDRESS1 default "",
		City: payload.ns0#OutputParameters.ns0#X_HEADER_VAL_REC.ns0#SHIP_TO_CITY default "",
		State: payload.ns0#OutputParameters.ns0#X_HEADER_VAL_REC.ns0#SHIP_TO_STATE default "",
		Zip: payload.ns0#OutputParameters.ns0#X_HEADER_VAL_REC.ns0#SHIP_TO_ZIP default "",
		Country: payload.ns0#OutputParameters.ns0#X_HEADER_VAL_REC.ns0#SHIP_TO_COUNTRY default ""
	},
	Items: payload.ns0#OutputParameters.ns0#X_LINE_TBL.*ns0#P_LINE_TBL_ITEM map ( pLINETBLITEM , indexOfPLINETBLITEM ) -> {
		Description: pLINETBLITEM.ns0#ORDERED_ITEM default "",
		OrderedQuantity: pLINETBLITEM.ns0#ORDERED_QUANTITY default 0,
		UnitListPrice: pLINETBLITEM.ns0#UNIT_LIST_PRICE default 0
	}
}
Now Save the Project.
Now let’s setup the PUT Order data into EBS.
Select put:\orders\(order_ID):application\json:gea-orders-sapi-config flow and select the Oracle EBS 12.2 connector Invoke PL/SQL REST service and drag and drop it to the flow as shown below.
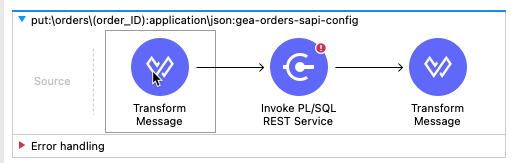
Notice, the connector is showing an red exclaimtion mark "!" on it. This is because we need to select the existing connector settings we had enabled earlier.
Click on the connector and a window will open as earlier when we were setting up the connector.
Now check the dropdown option values and select Oracle_EBS_12_2_Config.
Now select the PL/SQL and Operation values as below.
  PL/SQL: salesOrdersServices
  Operation: PROCESS_ORDER
| Please select the PL/SQL value and then select the Operation. |
Connector should be ready now. Let us modify the input values in the flow.
Select the Transform Message before the EBS connector clear the payload and paste the below code.
%dw 2.0
output application/xml
ns ns0 http://xmlns.oracle.com/apps/ont/rest/salesOrdersServices/process_order/
---
{
	ns0#InputParameters: {
		ns0#P_API_VERSION_NUMBER: "1.0",
		ns0#P_INIT_MSG_LIST: "T",
		ns0#P_RETURN_VALUES: "T",
		ns0#P_ACTION_COMMIT: "T",
		ns0#P_HEADER_REC: {
			ns0#HEADER_ID: attributes.uriParams.'order_ID' as String,
			ns0#ORDER_NUMBER: payload.orderNumber,
			ns0#ATTRIBUTE1: payload.description,
			ns0#BOOKED_FLAG: payload.booked,
			ns0#ORDER_TYPE_ID: payload.orderTypeId,
			//ns0#ORG_ID: payload.orgId,
			ns0#PAYMENT_TERM_ID: payload.paymentTermId,
			ns0#PRICE_LIST_ID: payload.priceListId,
			//ns0#SOLD_TO_ORG_ID: payload.soldToOrgId,
			ns0#TRANSACTIONAL_CURR_CODE: payload.transactionalCurrCode,
			ns0#PRICING_DATE: now() as Date{format: "dd-mmm-yy"},
			ns0#OPERATION: "UPDATE"
		},
		ns0#P_LINE_TBL: {
			(payload.orderItems map ( orderItem , indexOfOrderItem ) -> {
				ns0#P_LINE_TBL_ITEM: {
					ns0#HEADER_ID: attributes.uriParams.'order_ID' as String,
					ns0#LINE_ID: orderItem.lineId,
					ns0#INVENTORY_ITEM_ID: orderItem.inventoryItemId,
					ns0#LINE_TYPE_ID: orderItem.lineTypeId,
					ns0#ORDERED_ITEM_ID: orderItem.inventoryItemId,
					//ns0#ORDERED_QUANTITY: orderItem.orderedQuantity,
					ns0#PAYMENT_TERM_ID: orderItem.paymentTermId,
					//ns0#PRICE_LIST_ID: orderItem.priceListId,
					//ns0#UNIT_LIST_PRICE: orderItem.unitListPrice,
					//ns0#UNIT_SELLING_PRICE: orderItem.unitSellingPrice,
					ns0#OPERATION: "UPDATE"
				}
			})
		},
		ns0#P_RTRIM_DATA: "n"
	}
}
Select the Transform Message after the EBS connector clear the payload and paste the below code.
%dw 2.0
output application/json
ns ns0 http://xmlns.oracle.com/apps/ont/rest/salesOrdersServices/process_order/
---
{
	ReturnStatus: payload.ns0#OutputParameters.ns0#X_RETURN_STATUS default "",
	EBS_Header_ID: payload.ns0#OutputParameters.ns0#X_HEADER_REC.ns0#HEADER_ID as String default "",
	Order_Number: payload.ns0#OutputParameters.ns0#X_HEADER_REC.ns0#ORDER_NUMBER as String default "",
	Messages: payload.ns0#OutputParameters.ns0#X_MESSAGES.*ns0#X_MESSAGES_ITEM map ( xMESSAGESITEM , indexOfXMESSAGESITEM ) -> {
		messageText: xMESSAGESITEM.ns0#MESSAGE_TEXT default ""
	},
	PO_Number: payload.ns0#OutputParameters.ns0#X_HEADER_REC.ns0#CUST_PO_NUMBER default "",
	Invoice_To: {
		Org: payload.ns0#OutputParameters.ns0#X_HEADER_VAL_REC.ns0#INVOICE_TO_ORG default "",
		Address: payload.ns0#OutputParameters.ns0#X_HEADER_VAL_REC.ns0#INVOICE_TO_ADDRESS1 default "",
		City: payload.ns0#OutputParameters.ns0#X_HEADER_VAL_REC.ns0#INVOICE_TO_CITY default "",
		State: payload.ns0#OutputParameters.ns0#X_HEADER_VAL_REC.ns0#INVOICE_TO_STATE default "",
		Zip: payload.ns0#OutputParameters.ns0#X_HEADER_VAL_REC.ns0#INVOICE_TO_ZIP default "",
		Country: payload.ns0#OutputParameters.ns0#X_HEADER_VAL_REC.ns0#INVOICE_TO_COUNTRY default ""
	},
	Ship_To: {
		Customer: payload.ns0#OutputParameters.ns0#X_HEADER_VAL_REC.ns0#SHIP_TO_ORG default "",
		Address: payload.ns0#OutputParameters.ns0#X_HEADER_VAL_REC.ns0#SHIP_TO_ADDRESS1 default "",
		City: payload.ns0#OutputParameters.ns0#X_HEADER_VAL_REC.ns0#SHIP_TO_CITY default "",
		State: payload.ns0#OutputParameters.ns0#X_HEADER_VAL_REC.ns0#SHIP_TO_STATE default "",
		Zip: payload.ns0#OutputParameters.ns0#X_HEADER_VAL_REC.ns0#SHIP_TO_ZIP default "",
		Country: payload.ns0#OutputParameters.ns0#X_HEADER_VAL_REC.ns0#SHIP_TO_COUNTRY default ""
	},
	Items: payload.ns0#OutputParameters.ns0#X_LINE_TBL.*ns0#P_LINE_TBL_ITEM map ( pLINETBLITEM , indexOfPLINETBLITEM ) -> {
		Description: pLINETBLITEM.ns0#ORDERED_ITEM default "",
		OrderedQuantity: pLINETBLITEM.ns0#ORDERED_QUANTITY default 0,
		UnitListPrice: pLINETBLITEM.ns0#UNIT_LIST_PRICE default 0
	}
}
Now Save the Project.
Now we will see how to wrap these flow in a sub-flow so that we can re-use these calls internal to the project just like a re-usable function.
Step 3: Run and Test API Implementation
Now we are going to excute this project and test the API implementation.
Goto Run > Run and the project will start executing and processing.
Once the compilation of project is complete, the project is marked as Deployed. Also it will open up a API console link where we can go ahead and test our API implementation as shown below.
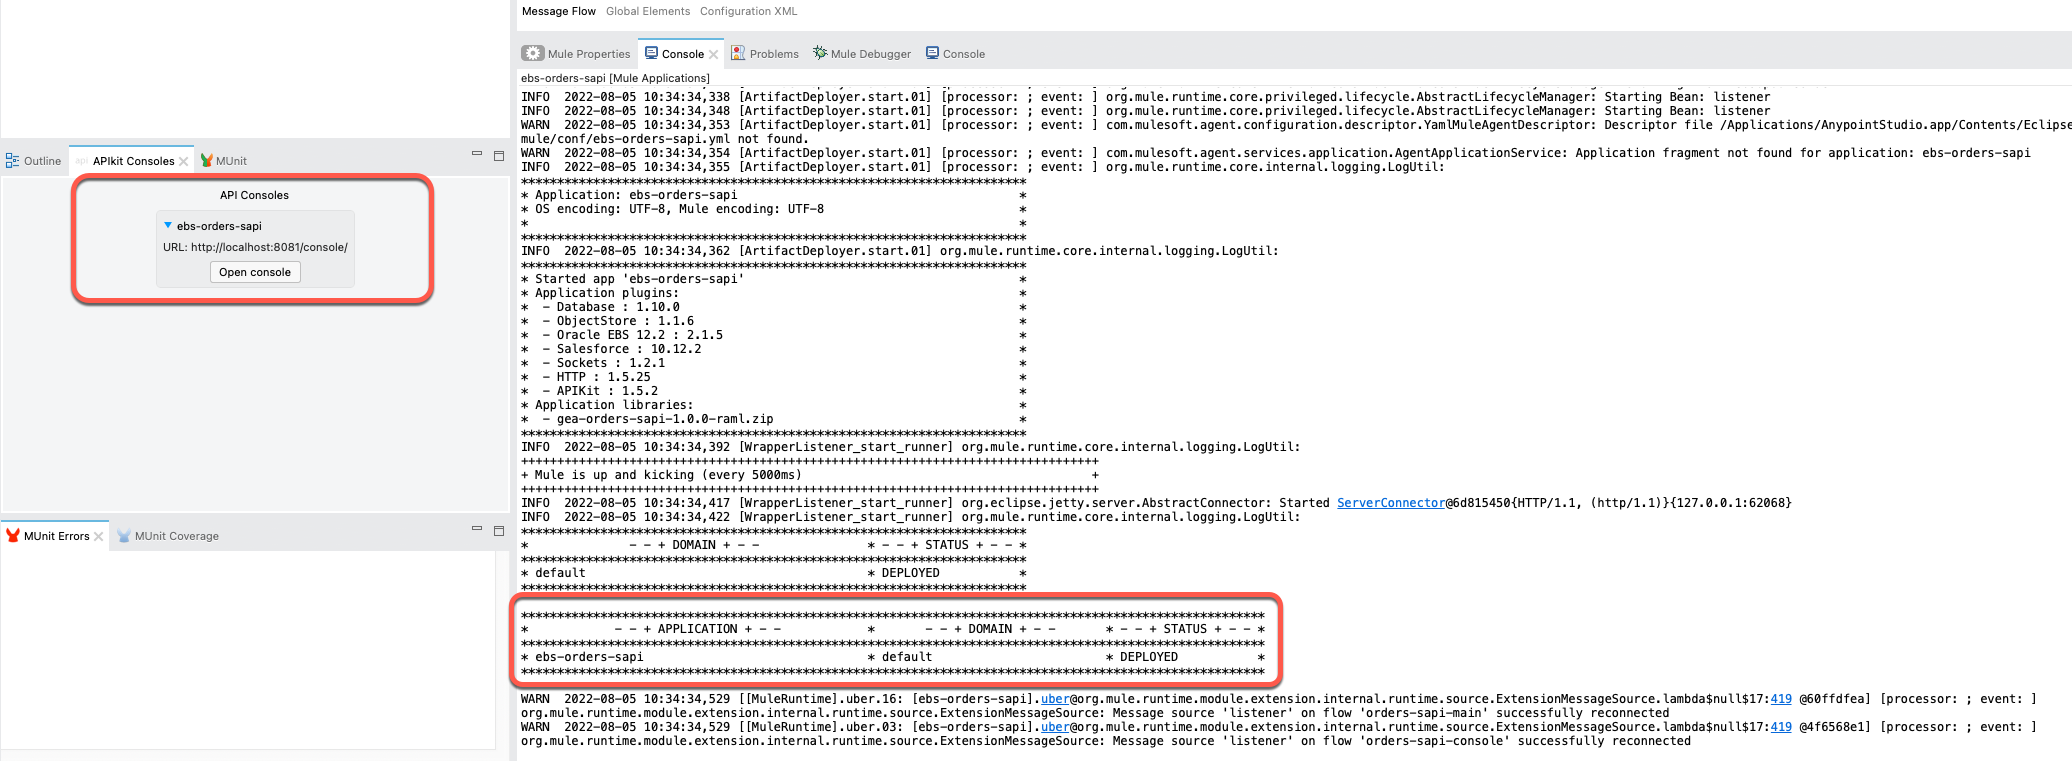
Click on the Open console button under API Consoles.
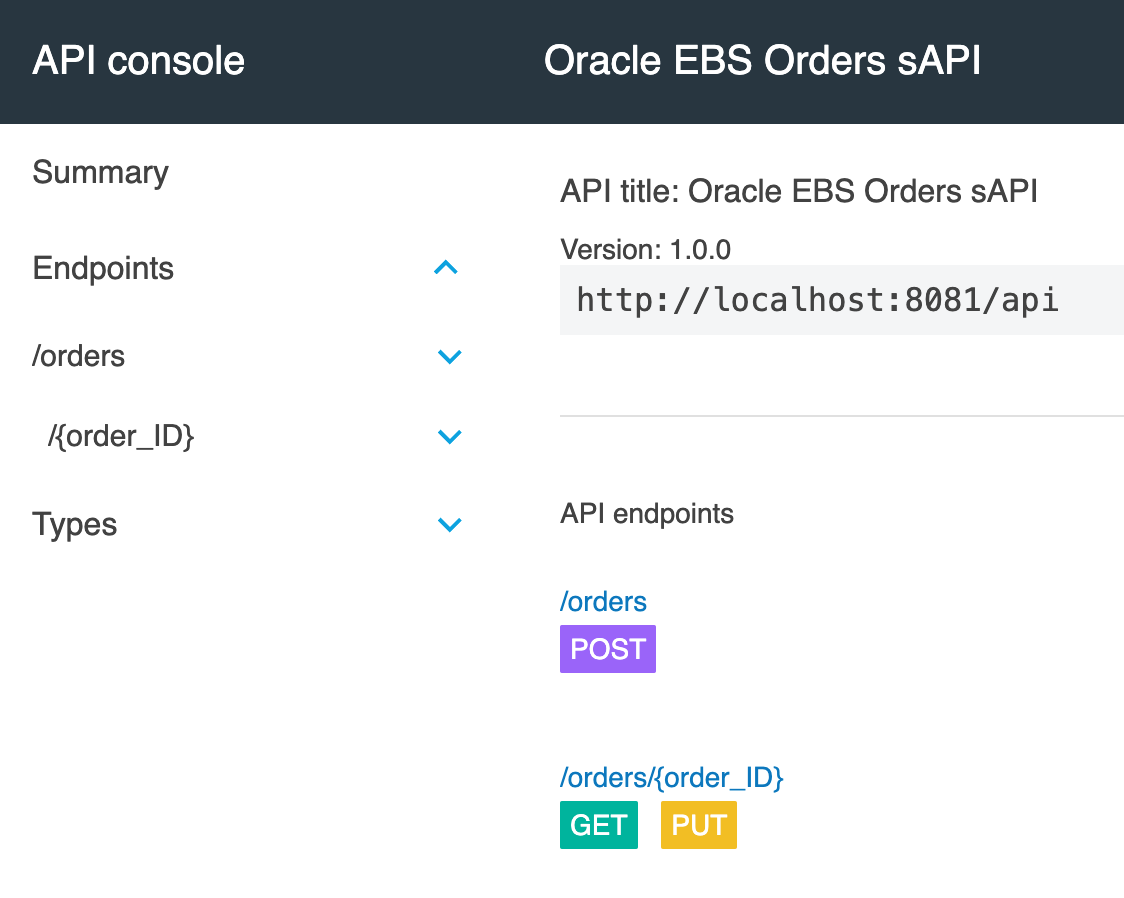
Now let’s test our API implementation.
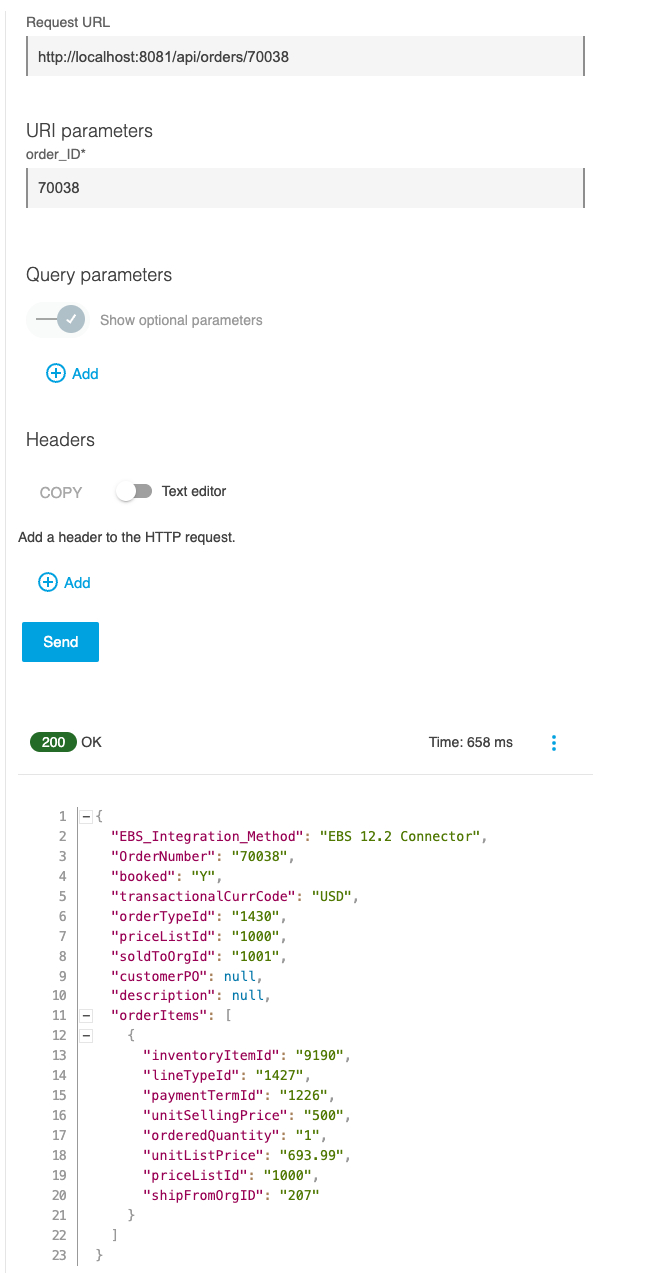
Click on GET under /orders/{Order_ID}. Enter the Order ID as below and click Send.
order_ID: 70038
Let’s try the same with POST request.
Click on the Summary button to go back to the API Console homepage.
Click on POST. Note the POST data is already defaulted under the Body. This is coming from the example we had set in the API implementation. We can also change the values if we like, but it has to be in the format presented here. For now let us keep it the same and proceed.
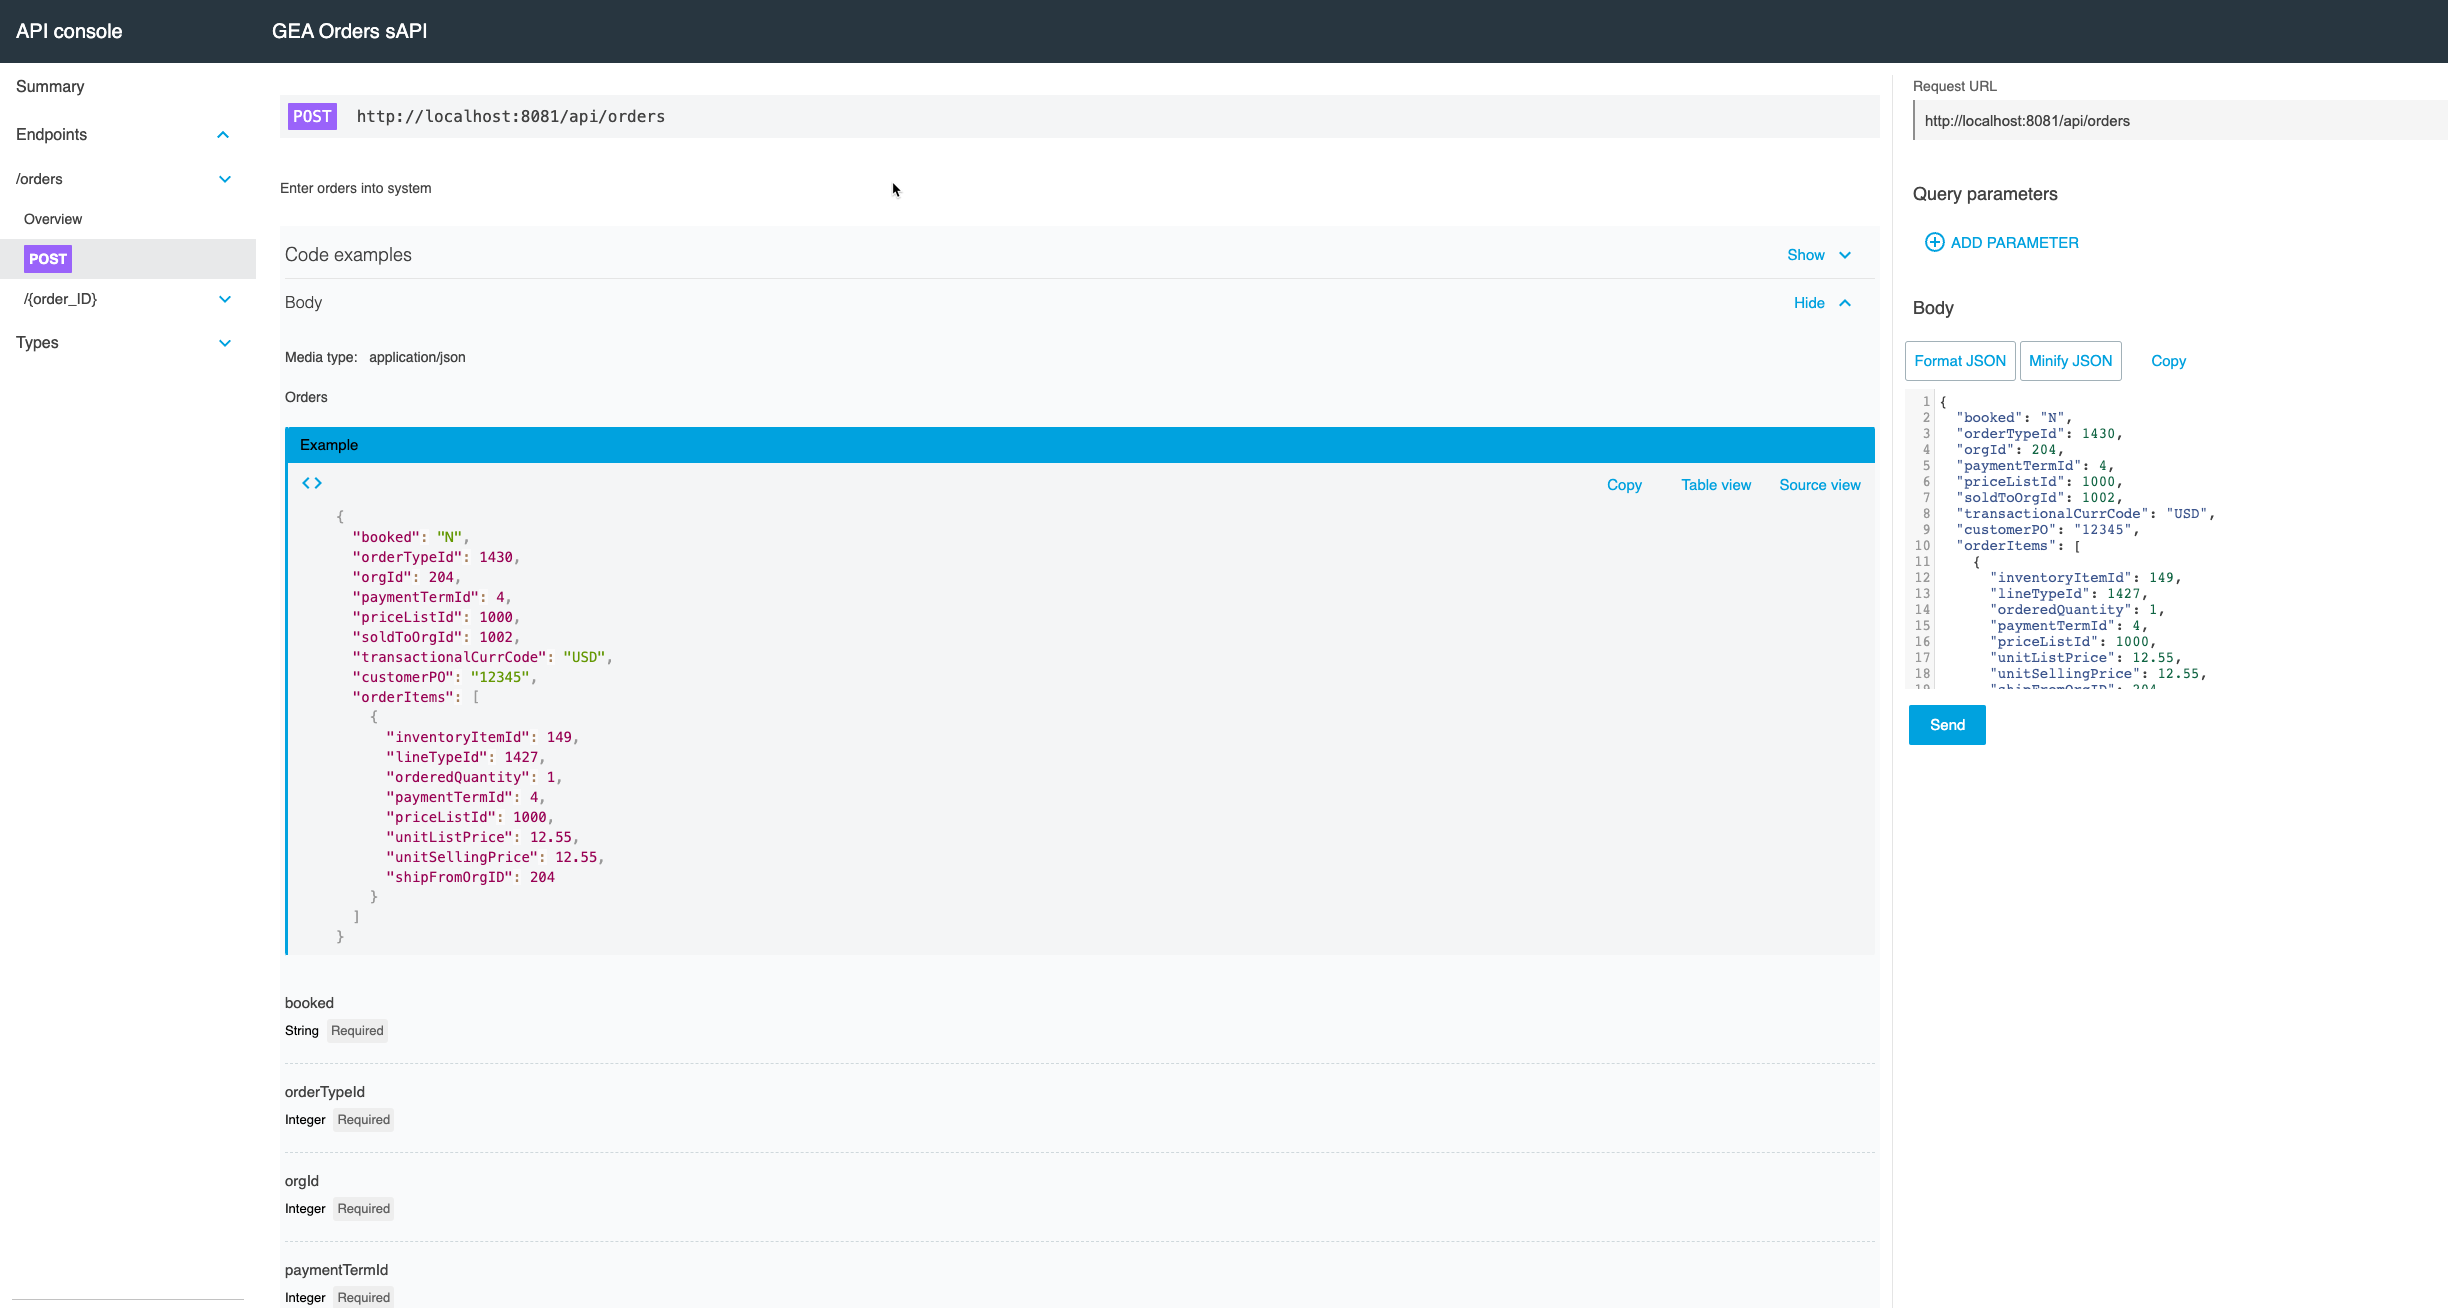
Click on Send
The Order should be created in Oracle EBS.
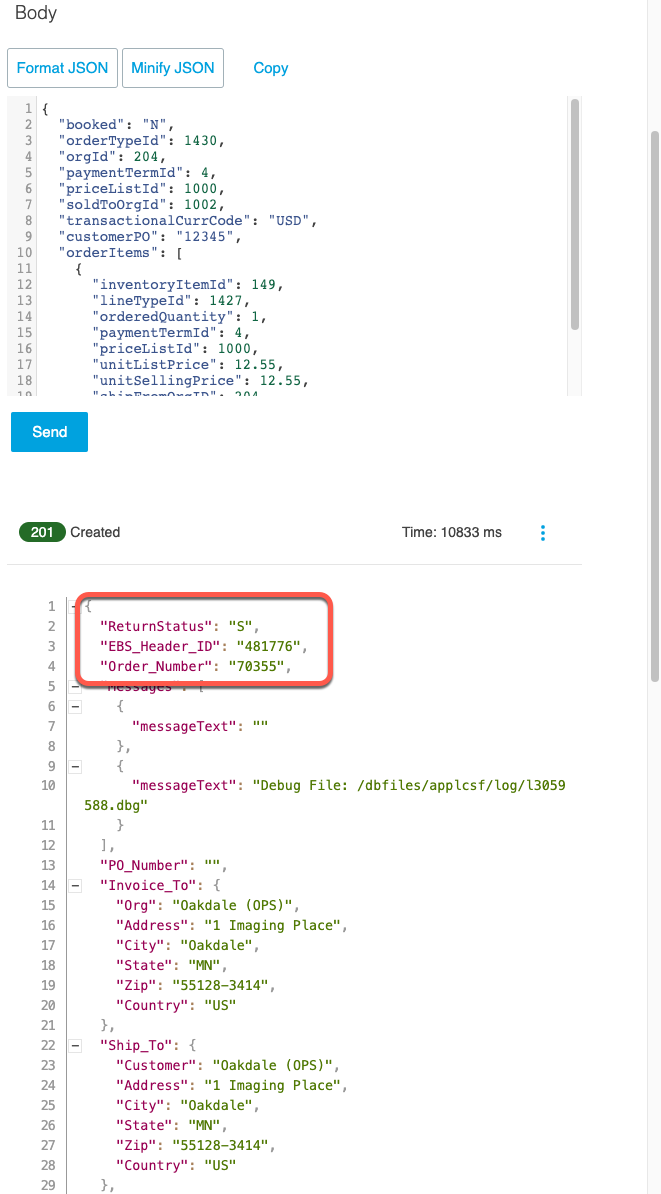
| Order_Number shows the Order Id created in Oracle and ReturnStatus shows the response. |
Step 4: Deploy API Implementation
Now we are going to deploy the project to CloudHub.
Click on the project.
Once the project is selected right-click on the project. Navigate to Anypoint Platform and click on Deploy to CloudHub
It will open up a new page and enter a unique value that can be used to deploy on CloudHub. Select Deployment Target as CloudHub and enter the application name as <Anypoint Login Id>-oracle-ebs-sapi. Keep rest of the settings as default. Click on Deploy Application
| Do not close the window until the option to close appears |
Once the application is deployed it will ask an option to close window. You can click on Open in Browser. It will re-direct you to the Runtime Manager page. If it asks for credentials please enter your Anypoint Platform credentials you used to login earlier in the workshop.
You are re-directed to the Runtime Manager page. You can have a look at the various parameters of the page or you can click on Applications in order to see the list of all applications deployed in CloudHub.
We just saw the complete build, implementation and deployment of an API.
Summary
You now have a more in depth understanding of the various APIs that are a part of this workshop. Some of the key points to remember are:
-
By adhering to an API Led approach to building out your Application Network you can foster reuse of existing assets, which will in turn improve the speed of delivering new features and enhancements to your organization.
-
By using REST interfaces and MuleSoft Connectors you can easily upgrade or replace back end systems without having to revisit all of the APIs that are in your Application Network.