Lab 7: SAP Inbound Orders
Overview
Earlier we learned how to create APIs from a RAML specification in Anypoint Studio. In this module, we will now upload an existing SAP S4/HANA System API that was designed earlier and publish to Exchange. Once the API is deployed in Exhange we will:
-
Create a new Mule Project with an API specification.
-
Configure the SAP S4/HANA Connector
-
Implement all the flows to connect to SAP S4/HANA
Step 1: Create a new Mule Project from the RAML
In this step we will create a new Mule application in Anypoint Studio from the SAP S4 HANA System API RAML Definition. This will be the implementation of our REST API.
If Anypoint Studio is not open yet, double-click on the icon on the desktop.
![]()
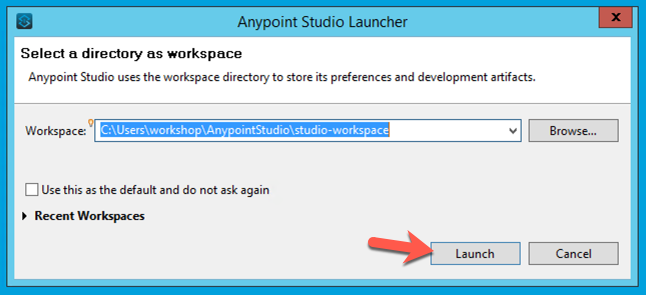
In the Anypoint Studio Launcher, keep the default Workspace location and click on Launch
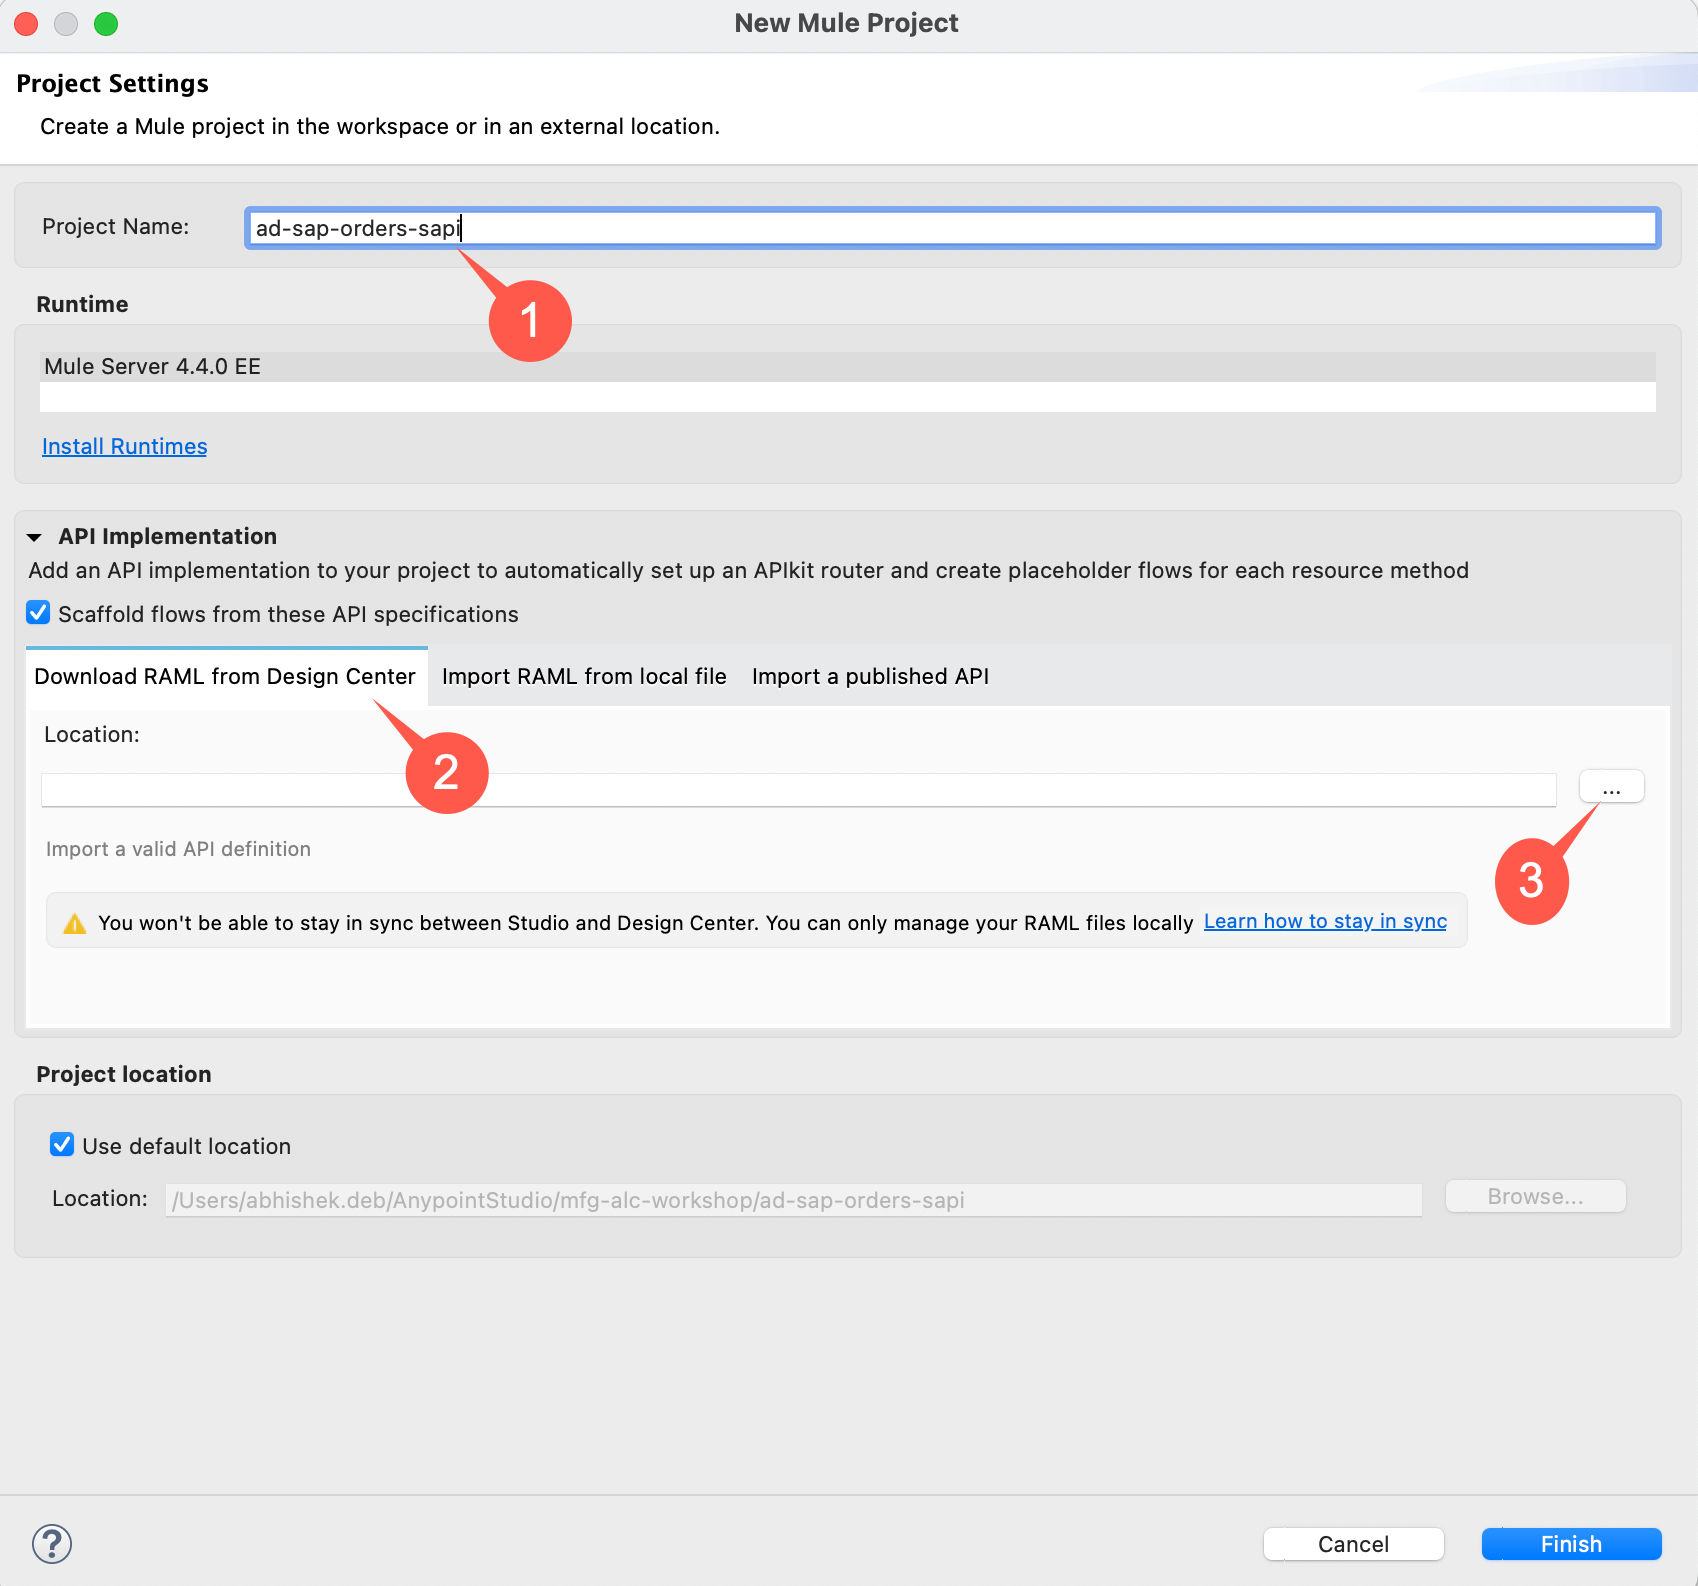
From the Anypoint Studio menu, select File > New > Mule Project to create a new project. A window will pop-up where you can define the details of this new application.
Give your project a name like the following:
Project Name: <your initials>-sap-hana-orders-sapi
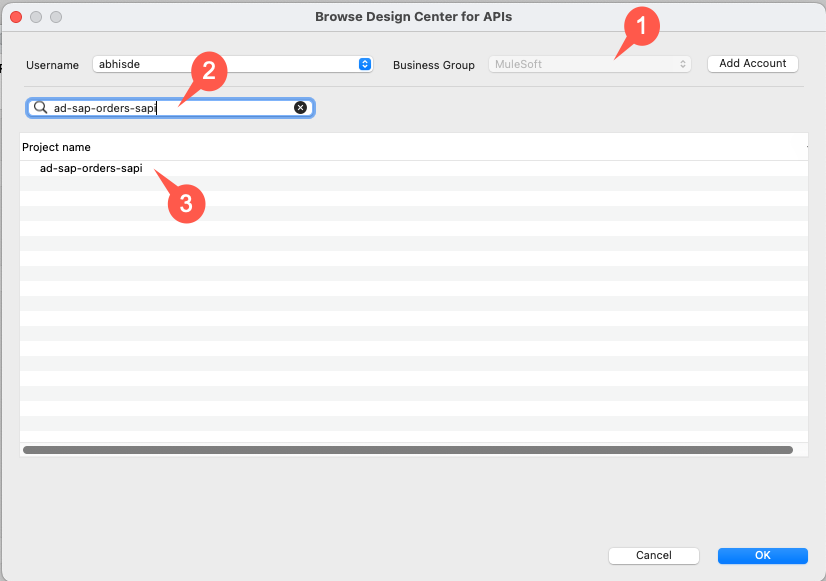
If the User login window pops up, login with your Anypoint Credentials. Otherwise, the Browse Design Center for APIs window should be displayed. We’re going to search and select the API that we designed in Lab 1.
-
Select the correct Business Group at the top right
-
Search for MuleSoft
-
Select the <initials>-sap-orders-sapi
-
Click Ok
Click Finish on the New Mule Project window. This will create a skeleton project that implements your API specification.
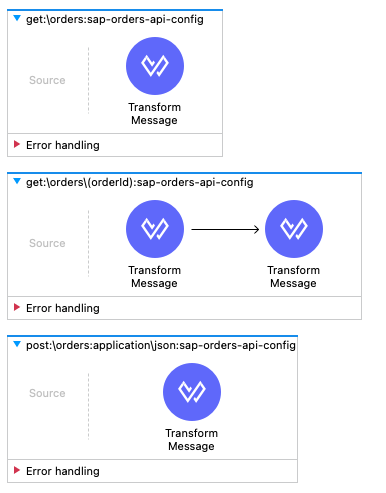
Let´s explore what was automatically generated.
At the top of the diagram you will see a flow called api-main and api-console followed by flows, one for each method defined in the RAML.
The flows below are defined by your API Design in the RAML file. Typically, there will be flows that look like this get:\resource, post:\resource, put:\resource, etc. Note that the name of the flow is very important for the APIkit router to be able to route the request to the appropriate flow - you don’t want to change these.
When APIkit detects example data in the response of a method in the RAML it inserts a Dataweave Message Transform into the flow which returns the static response specified by the example data reference.
The static response returned by the auto-generated Dataweave Message Transform allows you to test the API as a stub immediately after generation. Obviously these flows can be enhanced to provide more advanced mock services as well as evolve them into full API implementation as we will see in the next lab.
Besides the api-main and api-console flow also our two designed flow for account where created and filled with mocking data
-
get:\orders
-
get:\orders\(orderId)
-
post:\orders
Step 2: Enhance the flow for the GET /orders method
In this step we want to implement the flow to retrieve orders from SAP using the SAP ECC Connector.
2.1 Configure the SAP Connector
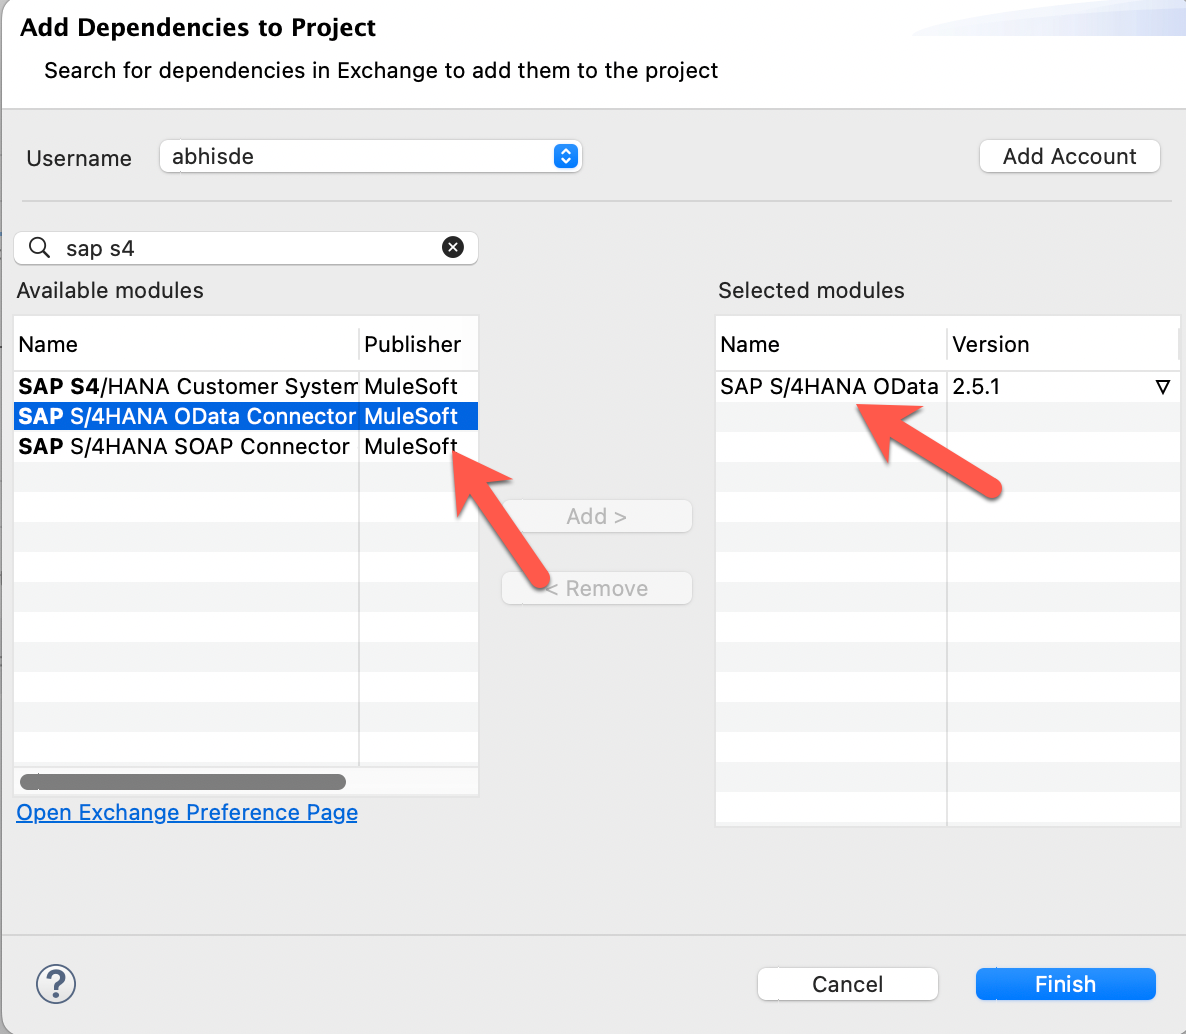
In your application canvas locate Search in Exchange on the right in the Mule Palette

-
Enter sap in the search field
-
Add the SAP S 4 HANA to the selected modules (latest Version)
-
Click Finish
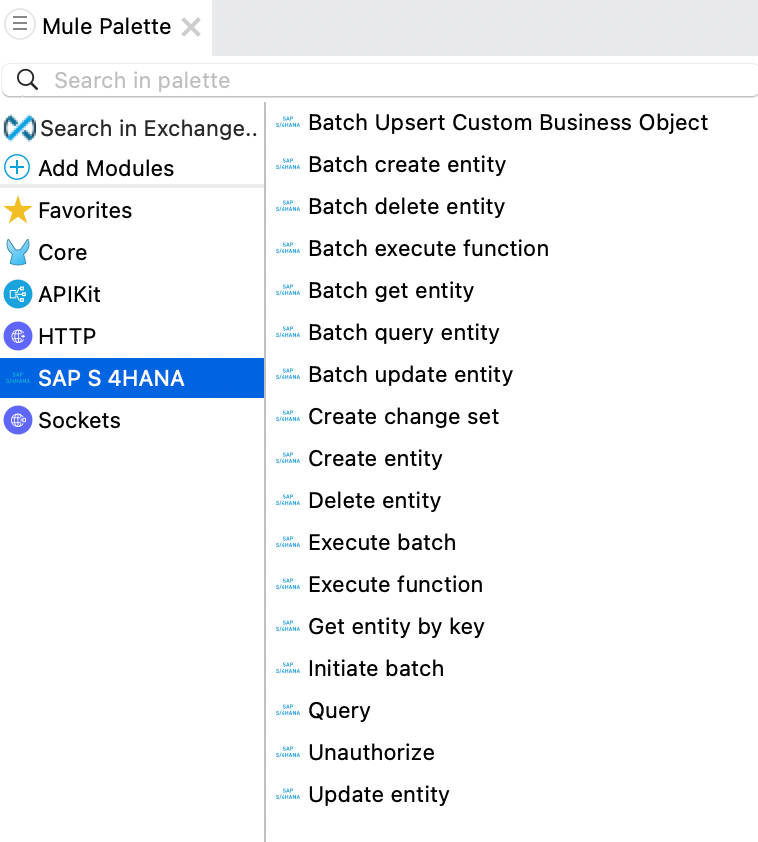
The SAP Connector has now been added to your project
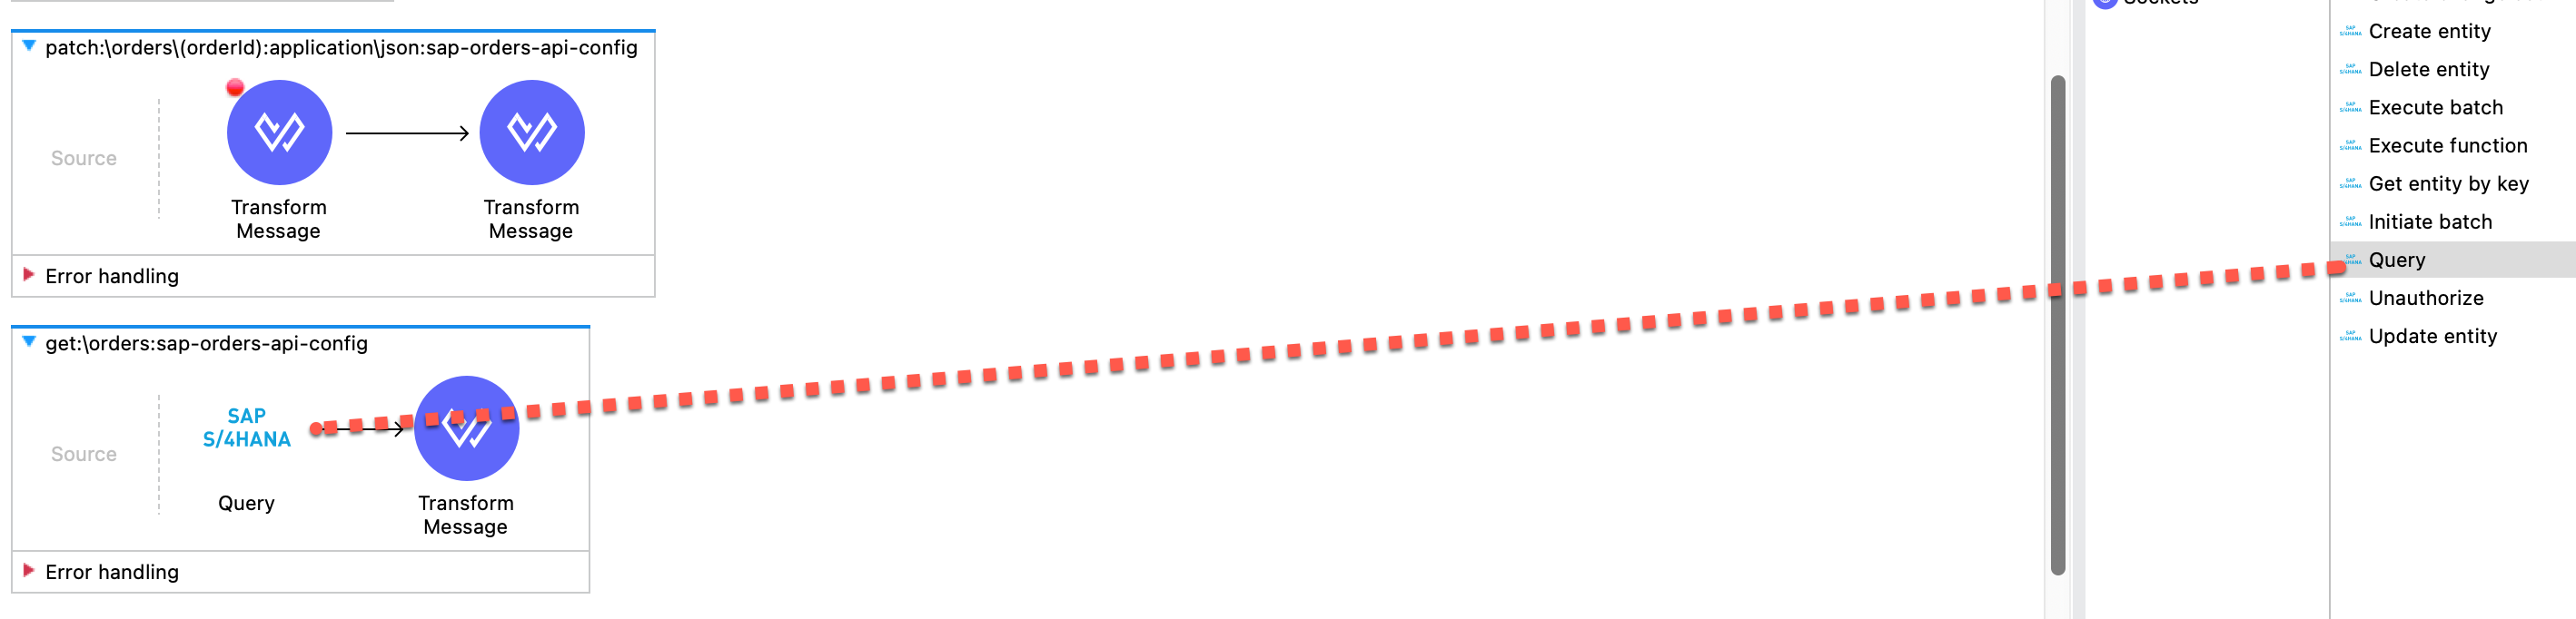
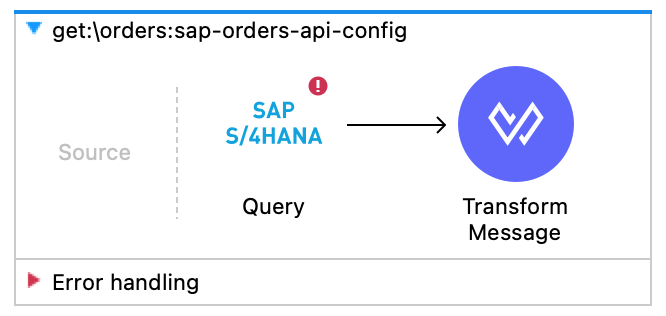
In your application canvas locate the flow named get:\orders:sap-orders-api-config. Then from Mule Palette, find and select the Query operation under SAP S4 HANA Connector, and drag the Query processor to the flow and place it before the Transform Message operation in the flow.
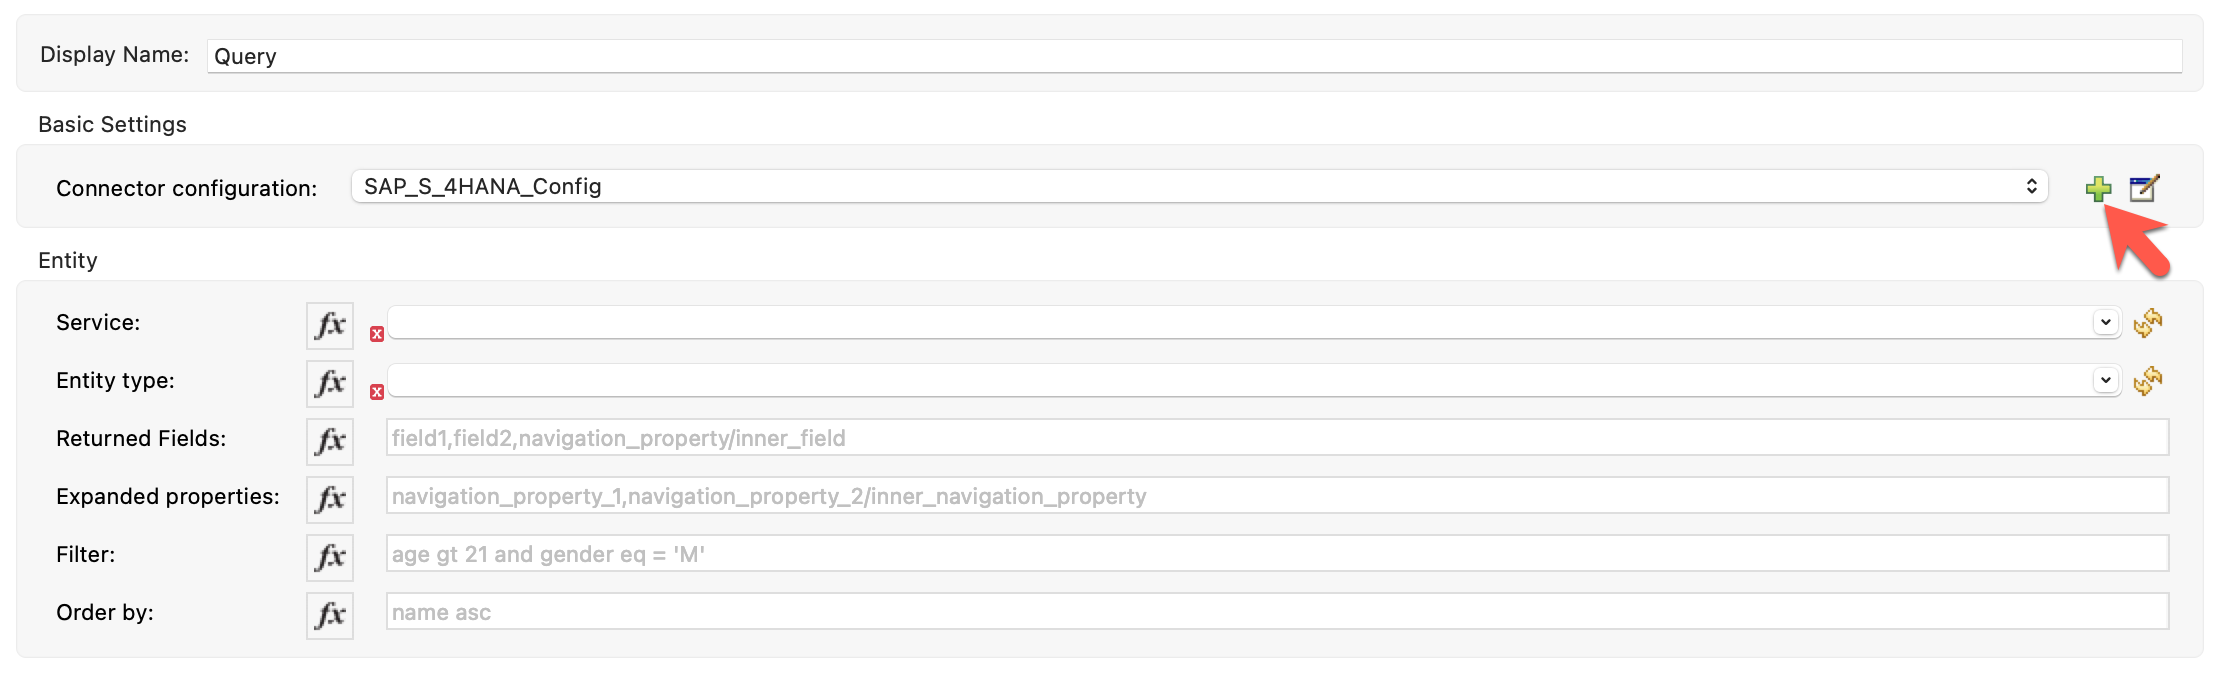
Below the canvas, the Query properties tab should have opened. If not, click on the Query component in the canvas again. We need to configure the connection properties for the connector next. Click the greeen plus sign next the Connector configuration field to add a new configuration.
Fill in the required fields under the General tab that match the fields below. The workshop instructor will provide the credentials to you.
Please select connection details as Basic Authentication from the dropdown list.
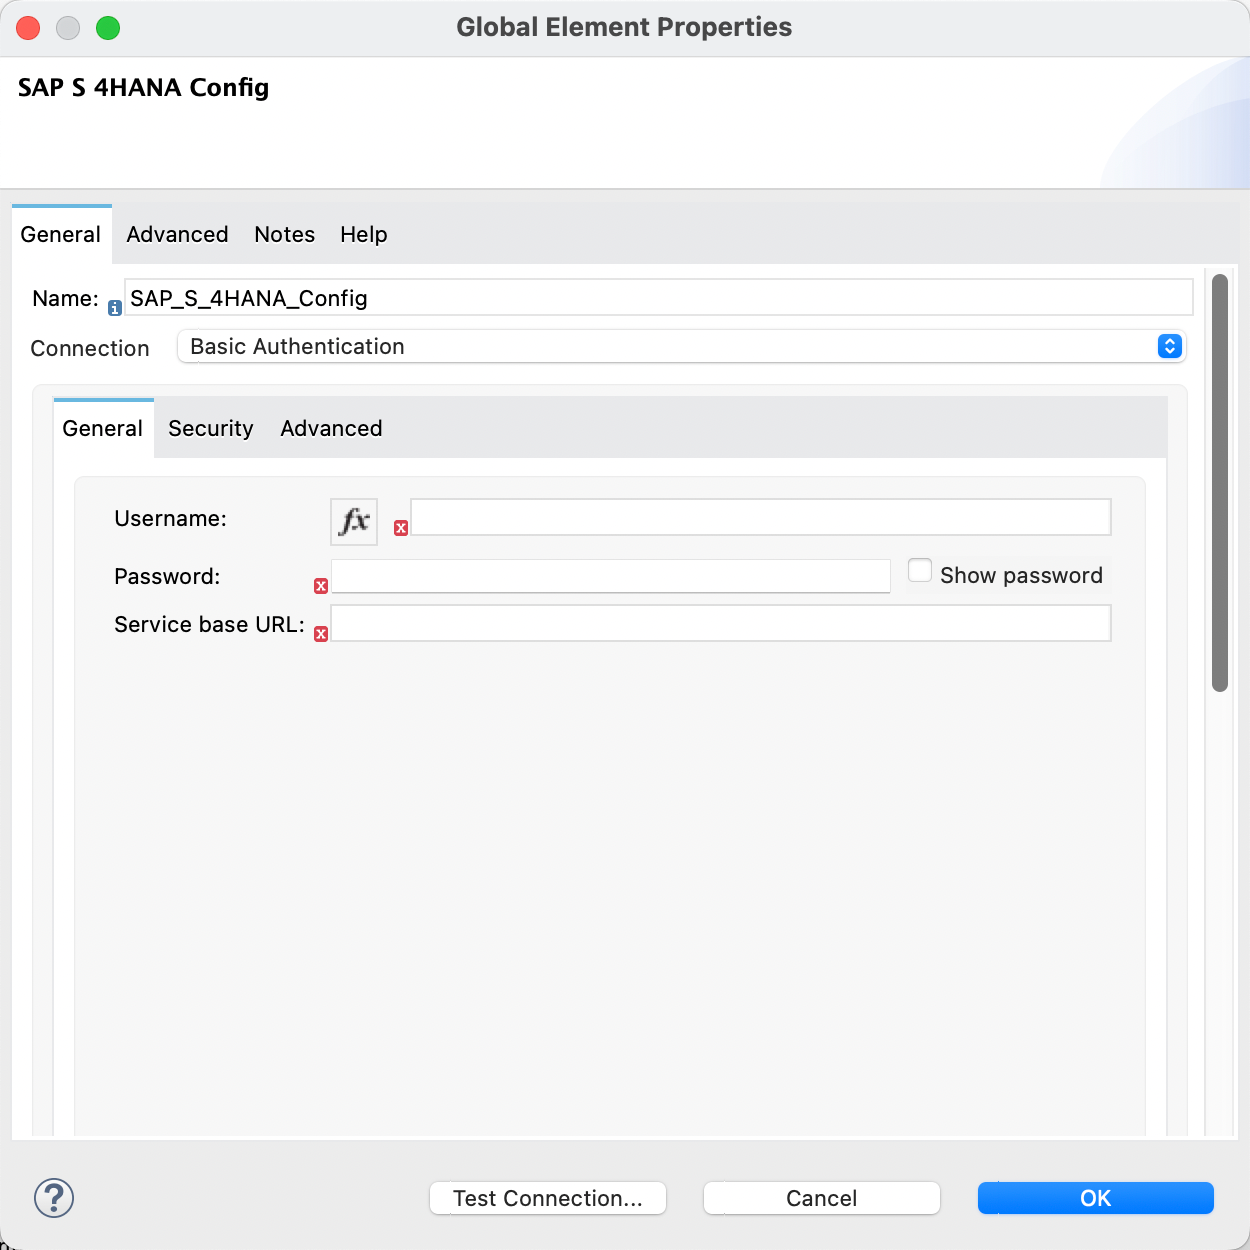
Under General tab enter the below values.
SAP S4 HANA details:
Username: |
<Username> |
Password : |
<Password> |
Service Base Url: |
<SAP HANA host url> |
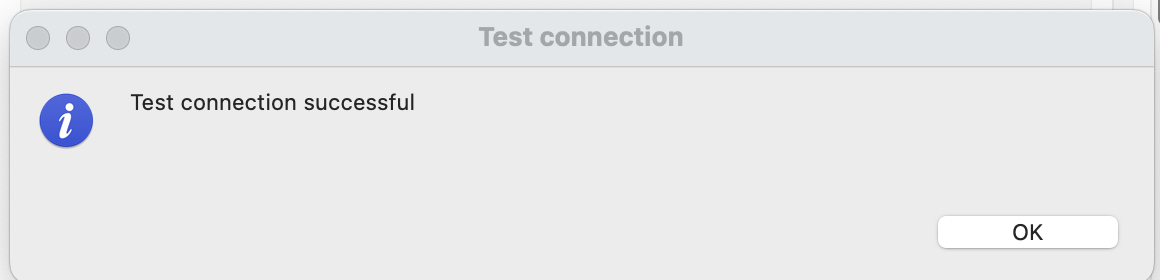
To make sure the credentials work, click on Test Connection…. If everything is configured correctly, a window showing that the connection was successful will pop-up. Click on OK and then click on OK to close the Global Element Properties window.
2.3 Configuring the SAP S4 HANA entities
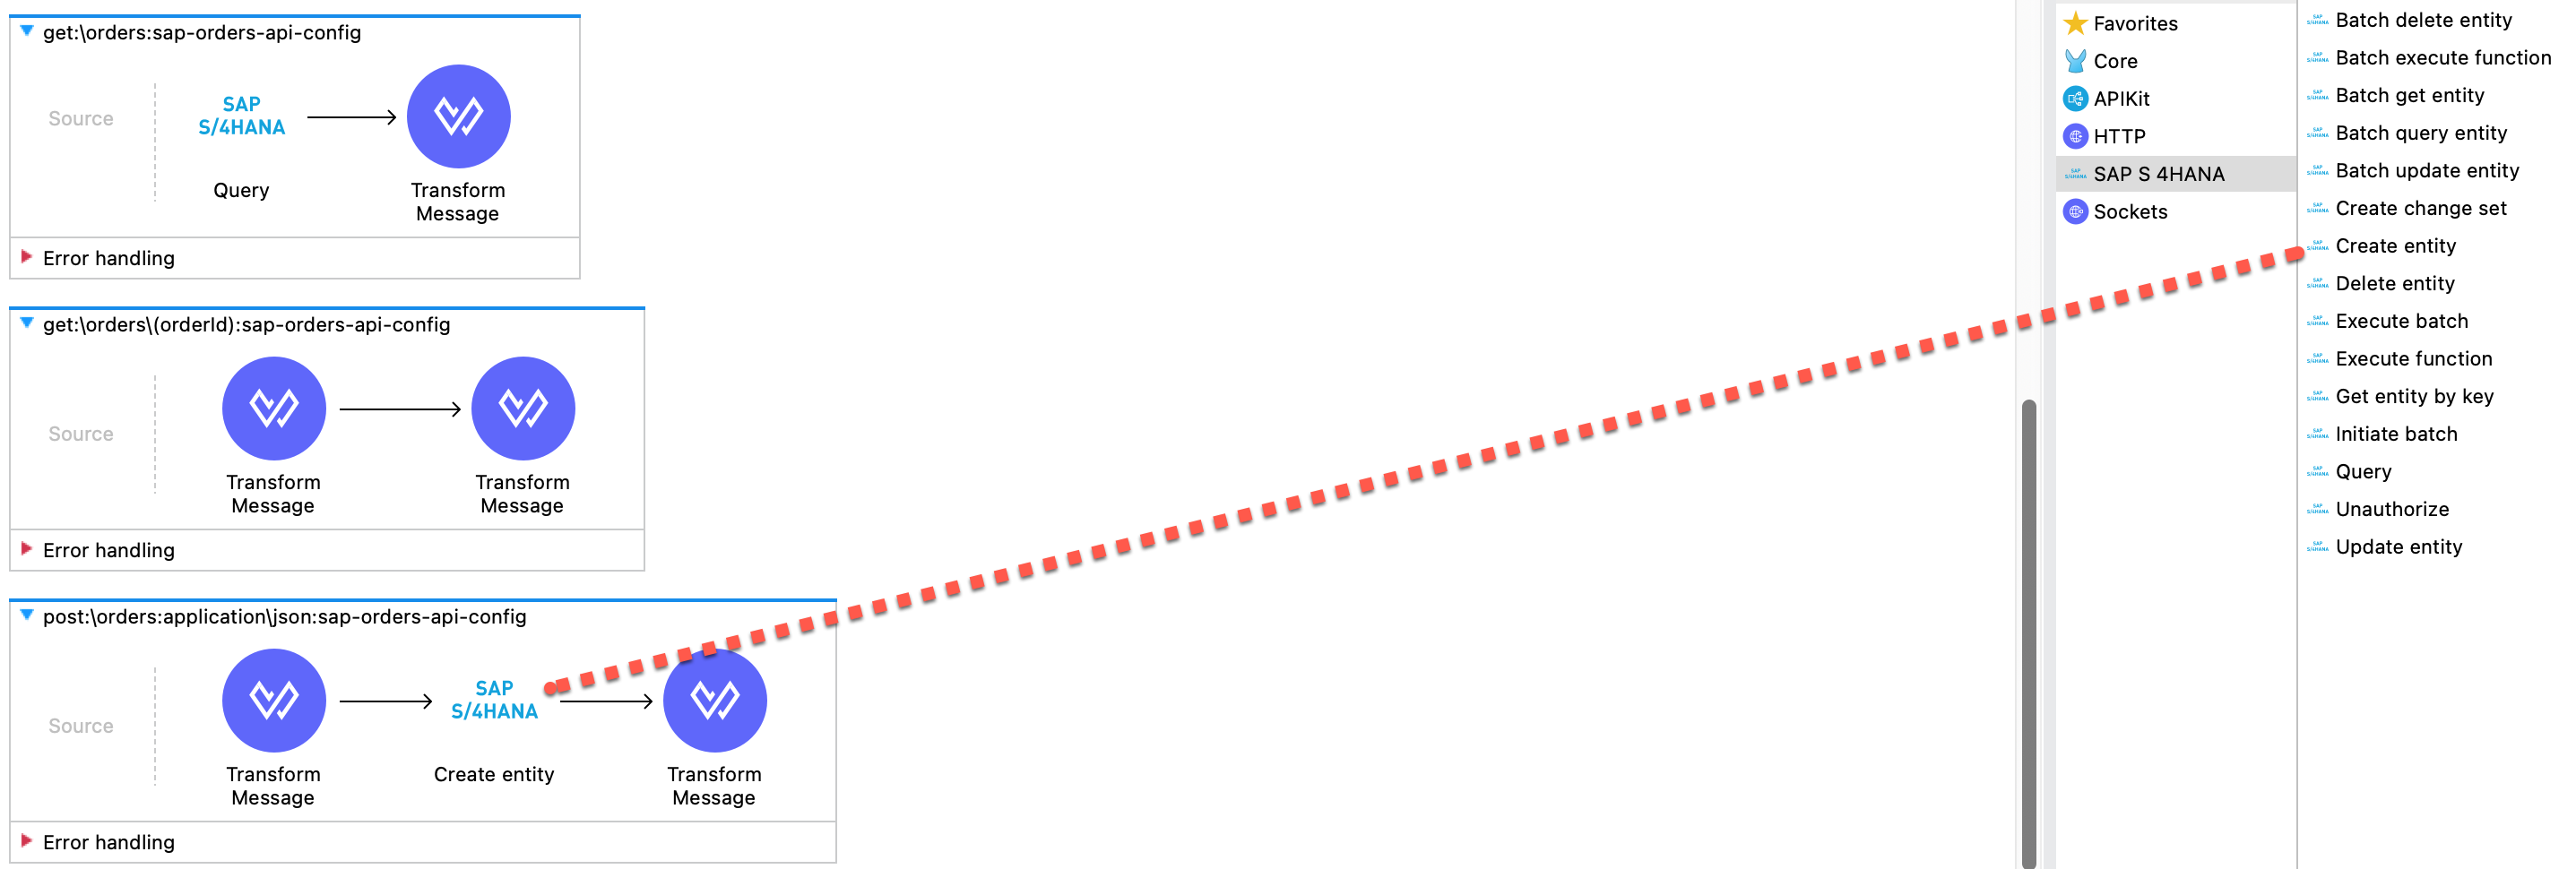
With the SAP S4 HANA connector configuration setup correctly, we can now configure the various SAP S4 HANA operations. Select the various entities as provided in the mule pallette for different uses.
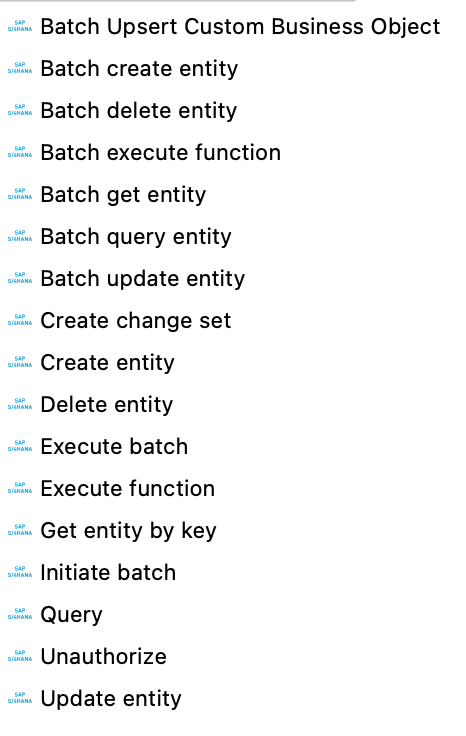
Anypoint Connector for SAP S/4HANA OData (SAP S/4HANA OData Connector) provides support for the OData APIs exposed by SAP S/4HANA Cloud and SAP S/4HANA on-premise.
The connector enables you to perform operations to:
-
Create, get, update, and delete entities
-
Retrieve a single entity
-
Query multiple entities
-
Invoke a remote function
-
Execute batch requests that consist of multiple requests
With the Query entity selected we need to enter the following values
SAP S4 HANA Query details:
Service: |
API_SALES_ORDER_SRV |
Entity type : |
A_SalesOrder |
Returned Fields : |
* |
Expanded properties : |
to_Item,to_PricingElement |
Filter : |
CreationDate ge datetime'2023-01-15T00:00:00' |
Now that the Query entity is configured to retrieve all orders details, we need to map how we want that data to be formatted when it’s returned in the API response. Click on the Transform Message that is next to the Query entity operation.
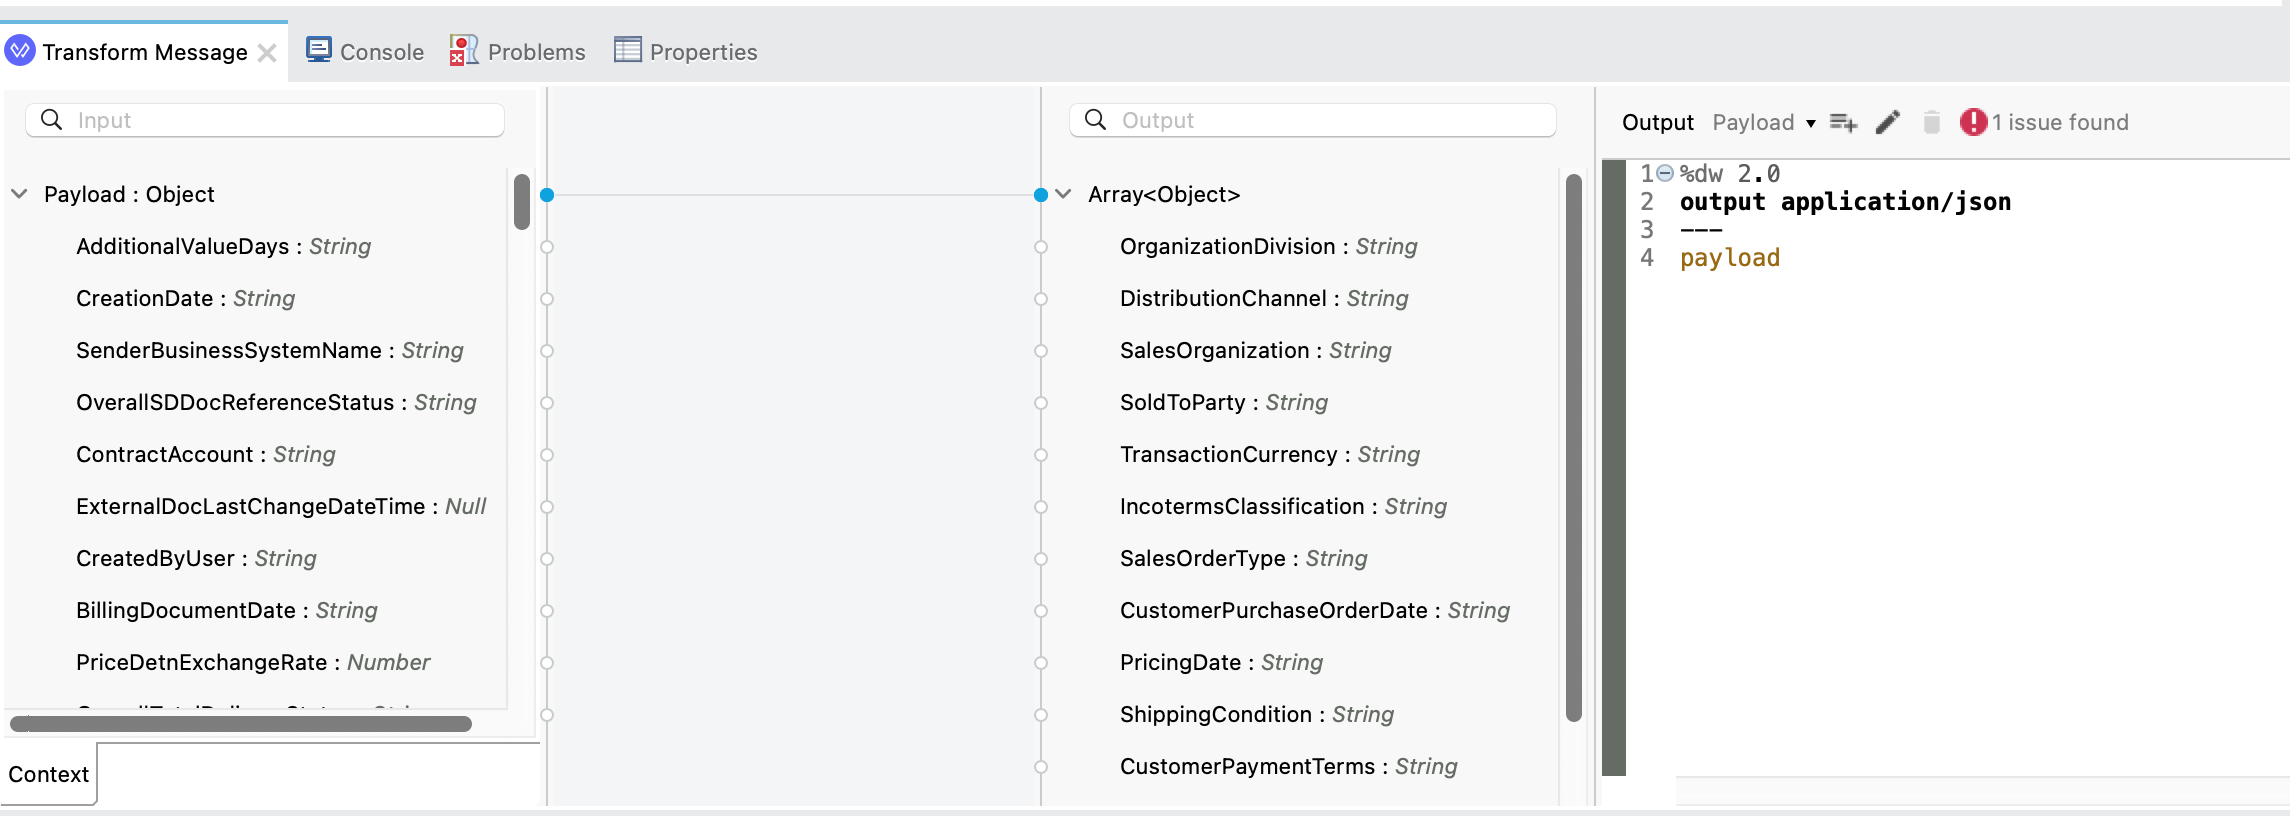
In the script editor, you can see that Anypoint Studio auto-generated the DataWeave based on the API specification. We’re going to over-write the script now so that it displays data from SAP S/4HANA instead of using example data.
Using the table below, map the following fields (left to right) On the left hand side, you will see the list of fields returned by SAP - we can map those to our data format using "drag and drop".
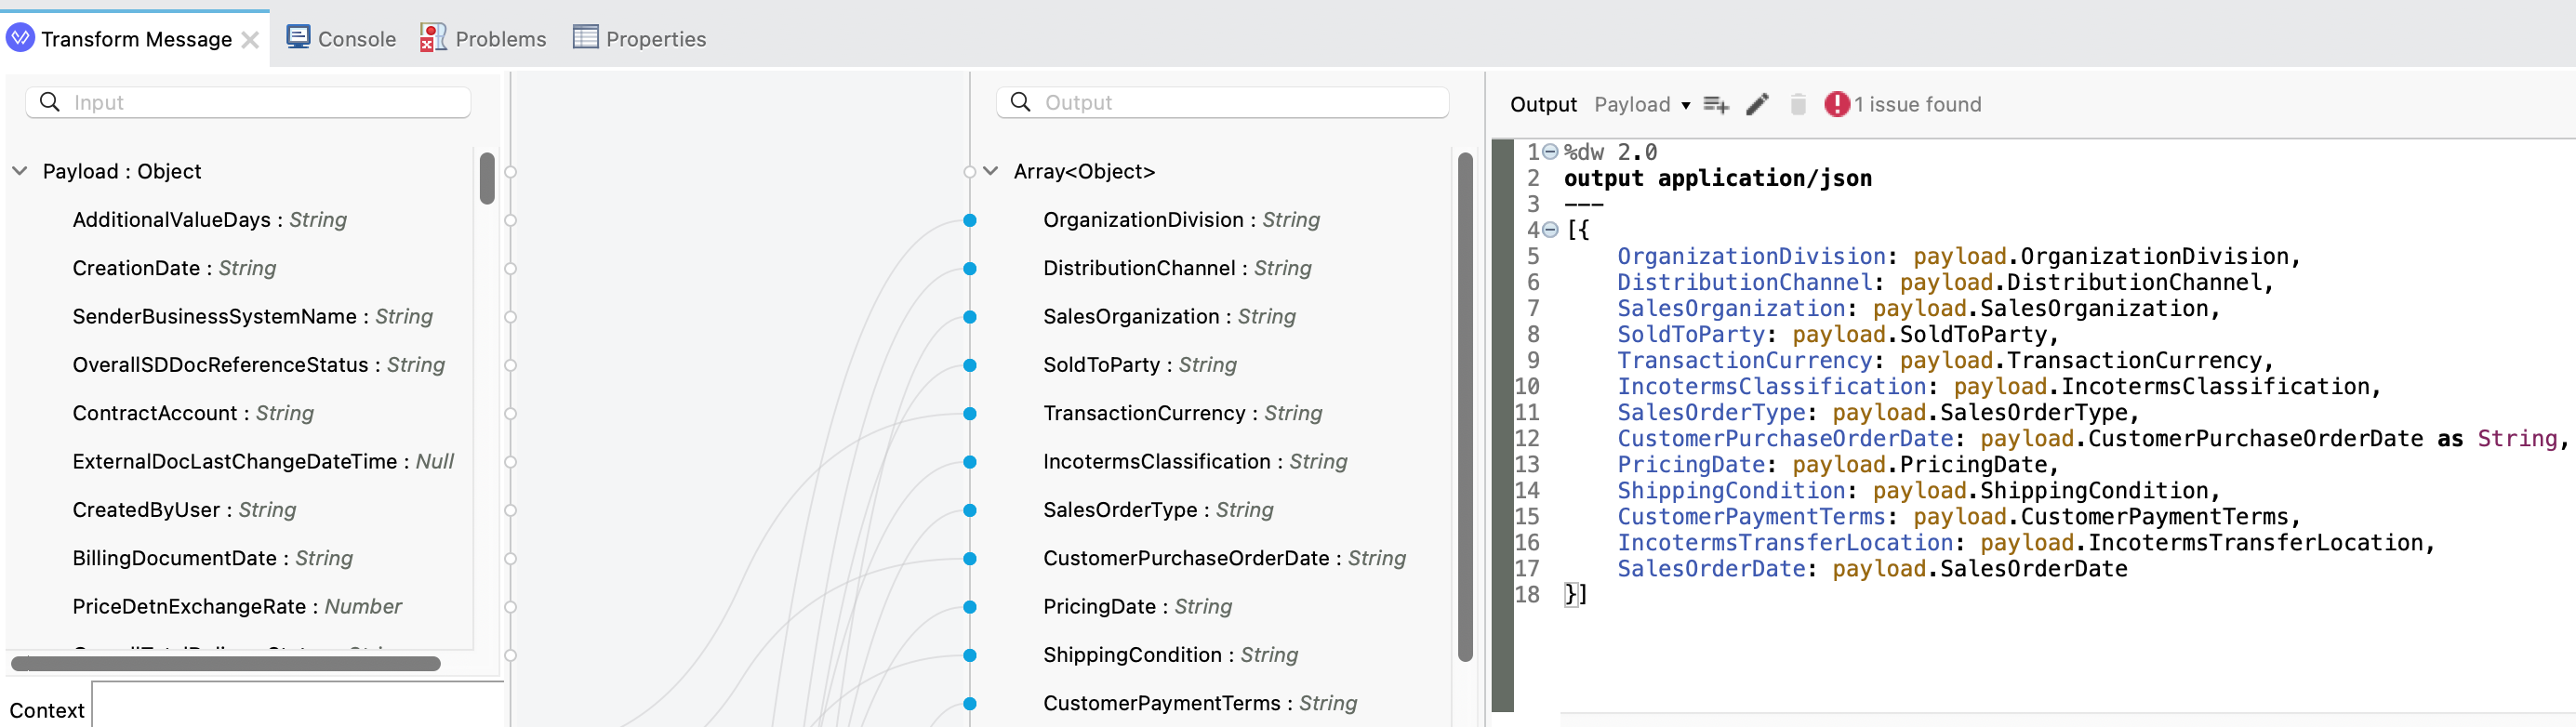
Or Else you can use the below code:
%dw 2.0
output application/json
---
[{
	OrganizationDivision: payload.OrganizationDivision,
	DistributionChannel: payload.DistributionChannel,
	SalesOrganization: payload.SalesOrganization,
	SoldToParty: payload.SoldToParty,
	TransactionCurrency: payload.TransactionCurrency,
	IncotermsClassification: payload.IncotermsClassification,
	SalesOrderType: payload.SalesOrderType,
	CustomerPurchaseOrderDate: payload.CustomerPurchaseOrderDate as String,
	PricingDate: payload.PricingDate,
	ShippingCondition: payload.ShippingCondition,
	CustomerPaymentTerms: payload.CustomerPaymentTerms,
	IncotermsTransferLocation: payload.IncotermsTransferLocation,
	SalesOrderDate: payload.SalesOrderDate
}]
Click on Save.

Now the flow should look smething like this.
Now we will build the Get Order by ID and Create orders flow.
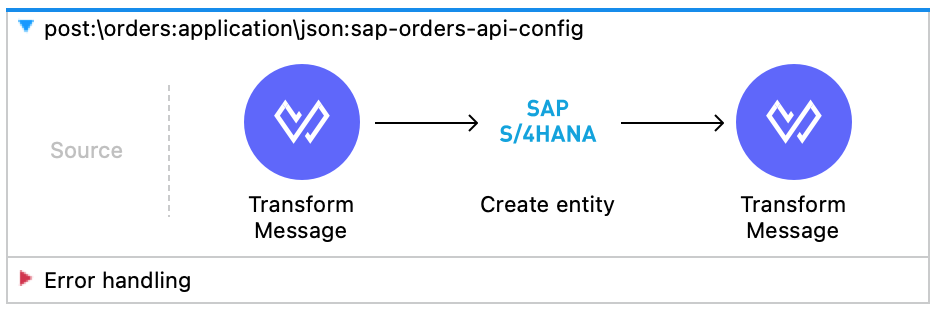
Let work on create orders. Select post:\orders:application\json:sap-orders-api-config flow.
Drag the Create Entity function for SAP S4 HANA
With the Create Entity entity selected we need to enter the following values.

SAP S4 HANA Create Entity details:
Service: |
API_SALES_ORDER_SRV |
Entity type : |
A_SalesOrder |
Entity : |
payload |
Now that the Create Entity is configured to create new orders, we need to map how we want that data to be formatted when it’s is passed to Create Entity. Click on the Transform Message that is before to the Create Entity operation.
In the script editor, you can see that Anypoint Studio auto-generated the DataWeave based on the API specification. We’re going to over-write the script now so that it displays data from SAP S/4HANA instead of using example data.
Using the table below, map the following fields (left to right) On the left hand side, you will see the list of fields returned by SAP - we can map those to our data format using "drag and drop".
Or Else you can use the below code:
%dw 2.0
output application/json
---
{
	SalesOrderType: payload.SalesOrderType,
	SalesOrganization: payload.SalesOrganization,
	DistributionChannel: payload.DistributionChannel,
	OrganizationDivision: payload.OrganizationDivision,
	SoldToParty: payload.SoldToParty,
	CustomerPurchaseOrderDate: "/Date(1665087278000)/",
	SalesOrderDate: "/Date(1665087278000)/",
	TransactionCurrency: payload.TransactionCurrency,
	PricingDate: "/Date(1665087278000)/",
	ShippingCondition: payload.ShippingCondition,
	IncotermsClassification: payload.IncotermsClassification,
	IncotermsTransferLocation: payload.IncotermsTransferLocation,
	CustomerPaymentTerms: payload.CustomerPaymentTerms
}
Now let’s select the Transform Message after the Create Entity we need to modify the orderNumber value from default value from API spec to what is returned by SAP S4 HANA
Transform Message value:
orderNumber: |
payload.SalesOrder as String |
The flow is ready and should look as below.
Click on Save.
Now select get:\orders\(orderId):sap-orders-api-config flow. In this flow drag the Get entoty by key from Mule Palette to the flow as shown below.
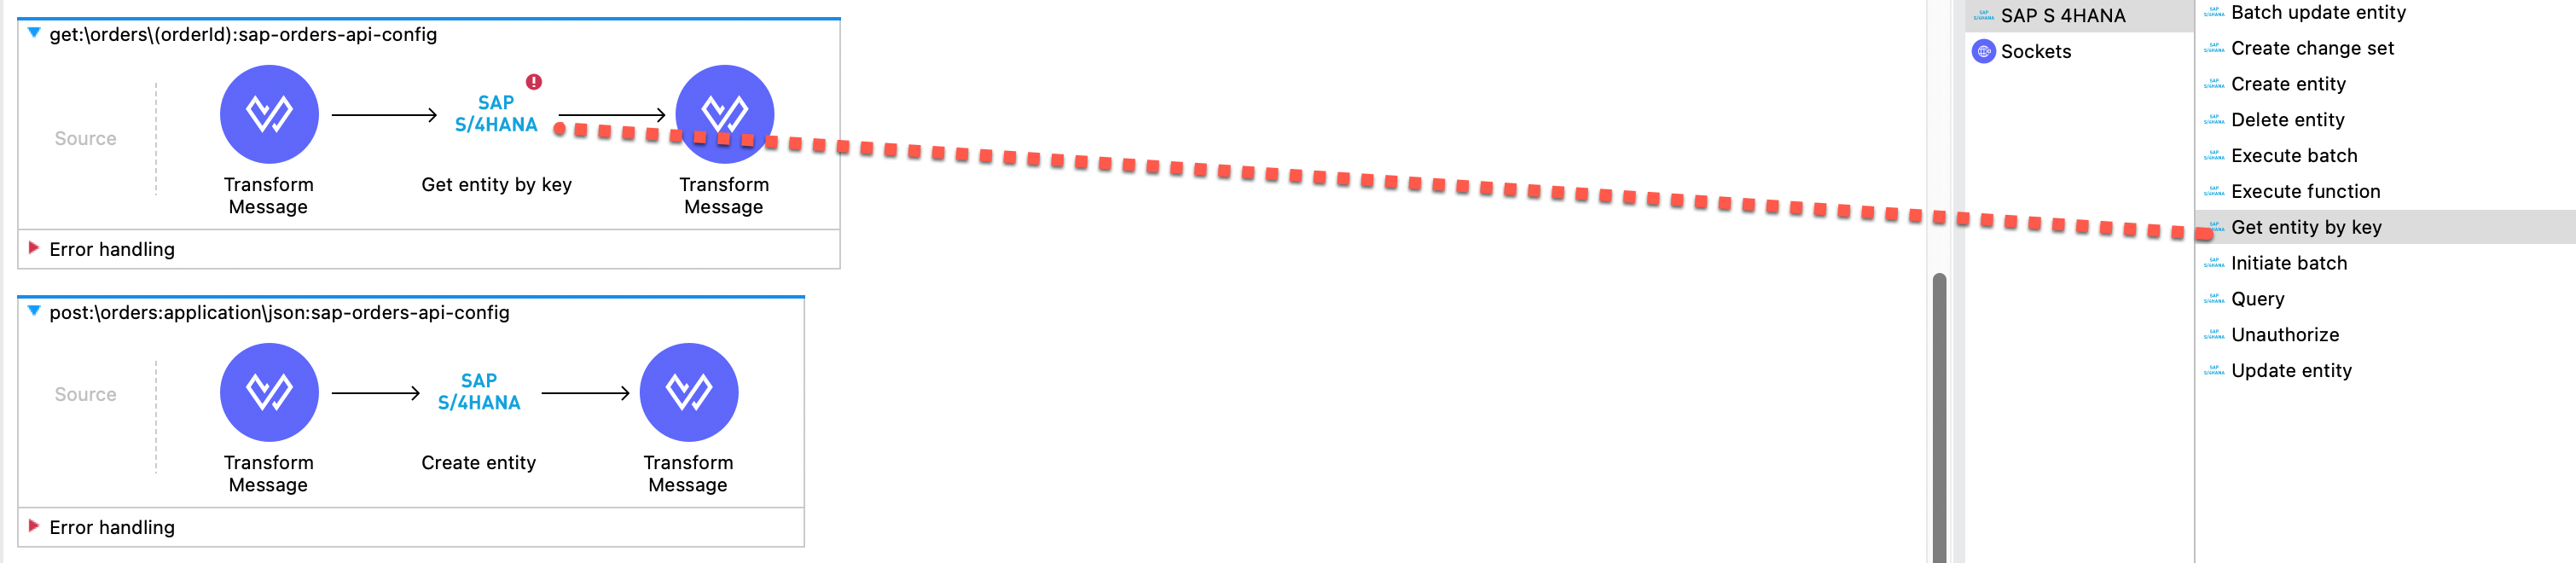
Now enter the connector values as shown below.
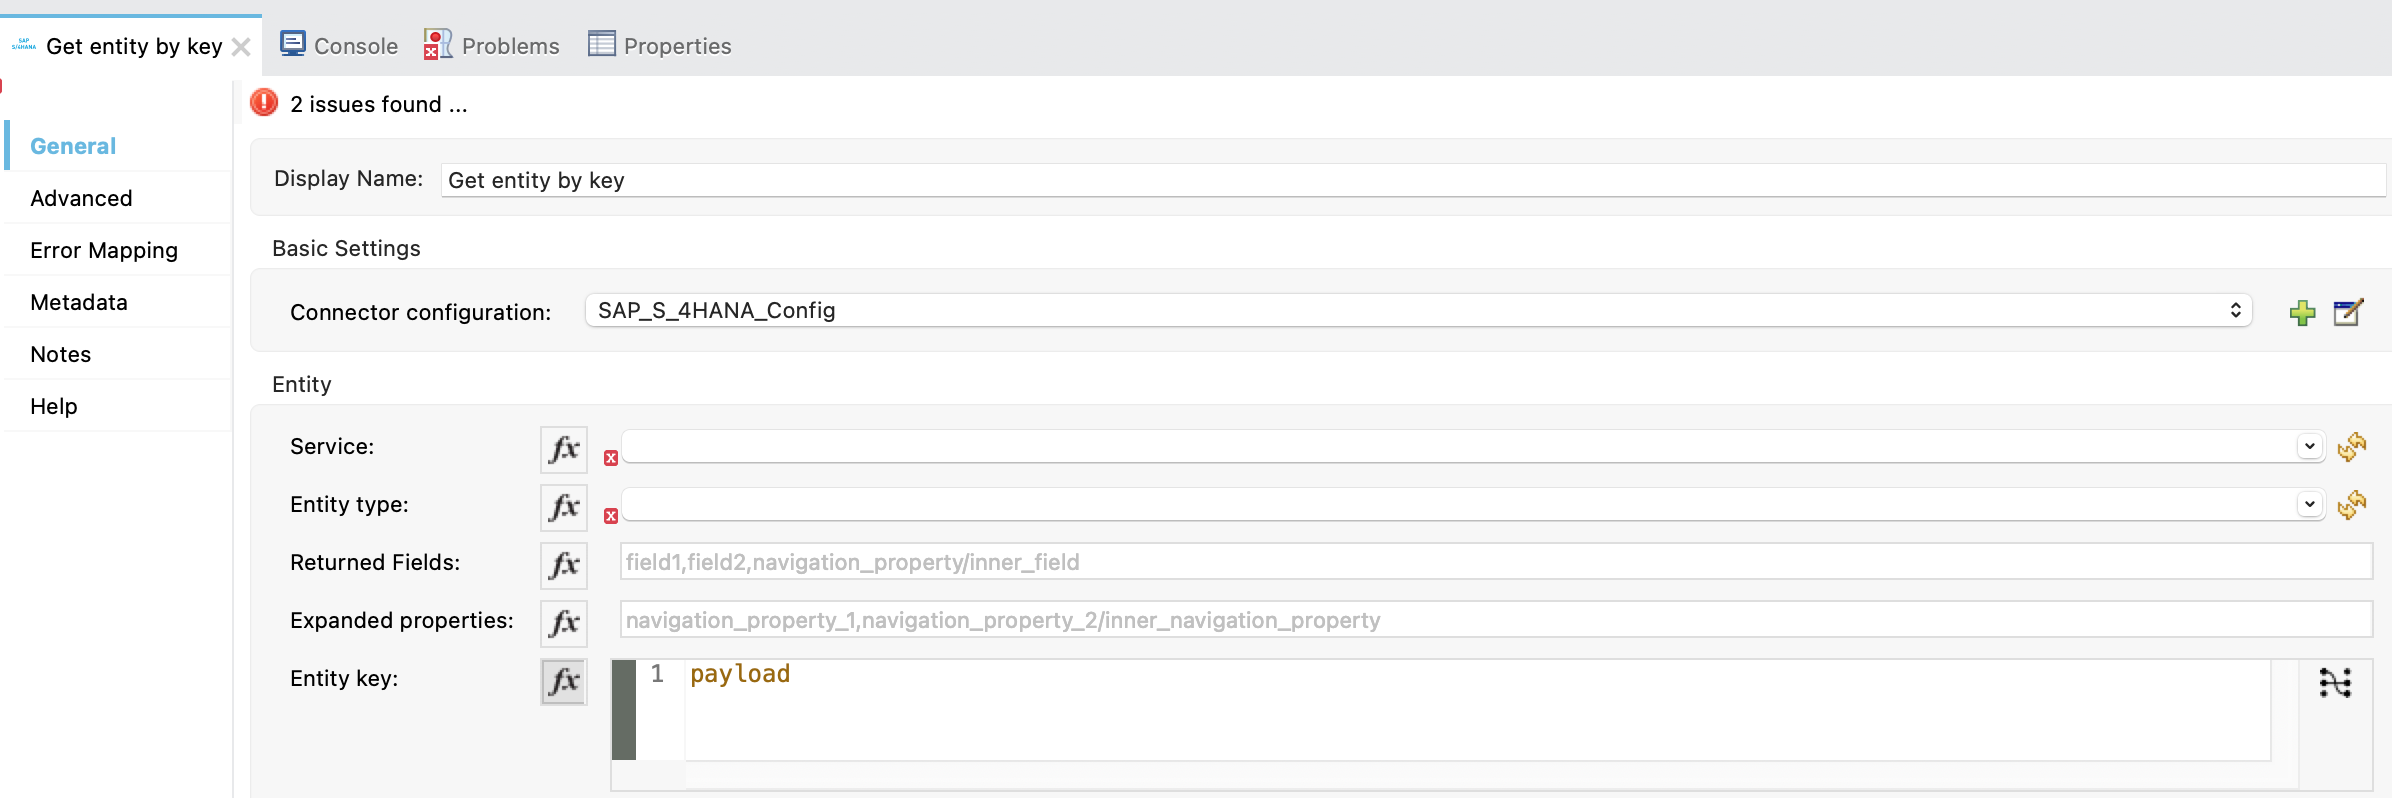
Service: |
API_SALES_ORDER_SRV |
Entity type: |
A_SalesOrder |
Returned Fields: |
* |
Entity key: |
"SalesOrder": vars.orderId |
| The orderId data is created under variable orderId output under the first Transform Message. This is the default attributes setup from RAML. |
Now that the Get entity by key is configured to create new orders, we need to map how we want that data to be formatted when it’s is passed to Get entity by key. Click on the Transform Message that is after to the Get entity by key operation.
In the script editor, you can see that Anypoint Studio auto-generated the DataWeave based on the API specification. We’re going to over-write the script now so that it displays data from SAP S/4HANA instead of using example data.
Using the table below, map the following fields (left to right) On the left hand side, you will see the list of fields returned by SAP - we can map those to our data format using "drag and drop".
Or Else you can use the below code:
%dw 2.0
output application/json
---
{
	OrganizationDivision: payload.OrganizationDivision,
	DistributionChannel: payload.DistributionChannel,
	SalesOrganization: payload.SalesOrganization,
	SoldToParty: payload.SoldToParty,
	TransactionCurrency: payload.TransactionCurrency,
	IncotermsClassification: payload.IncotermsClassification,
	SalesOrderType: payload.SalesOrderType,
	CustomerPurchaseOrderDate: payload.CustomerPurchaseOrderDate as String default "",
	PricingDate: payload.PricingDate as String default "",
	ShippingCondition: payload.ShippingCondition,
	CustomerPaymentTerms: payload.CustomerPaymentTerms,
	IncotermsTransferLocation: payload.IncotermsTransferLocation,
	SalesOrderDate: payload.SalesOrderDate as String default ""
}
Click on Save.
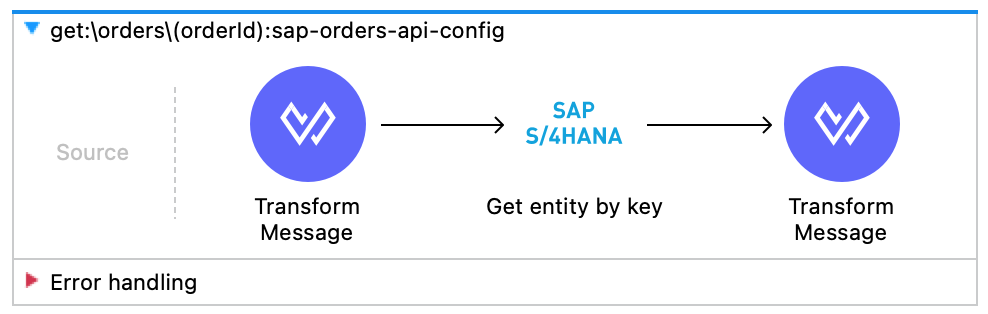
Now the flow should look something like this.
Step 3: Run and Test API Implementation
Now we are going to excute this project and test the API implementation.
Goto Run > Run and the project will start executing and processing.
Once the compilation of project is complete, the project is marked as Deployed. Also it will open up a API console link where we can go ahead and test our API implementation as shown below.
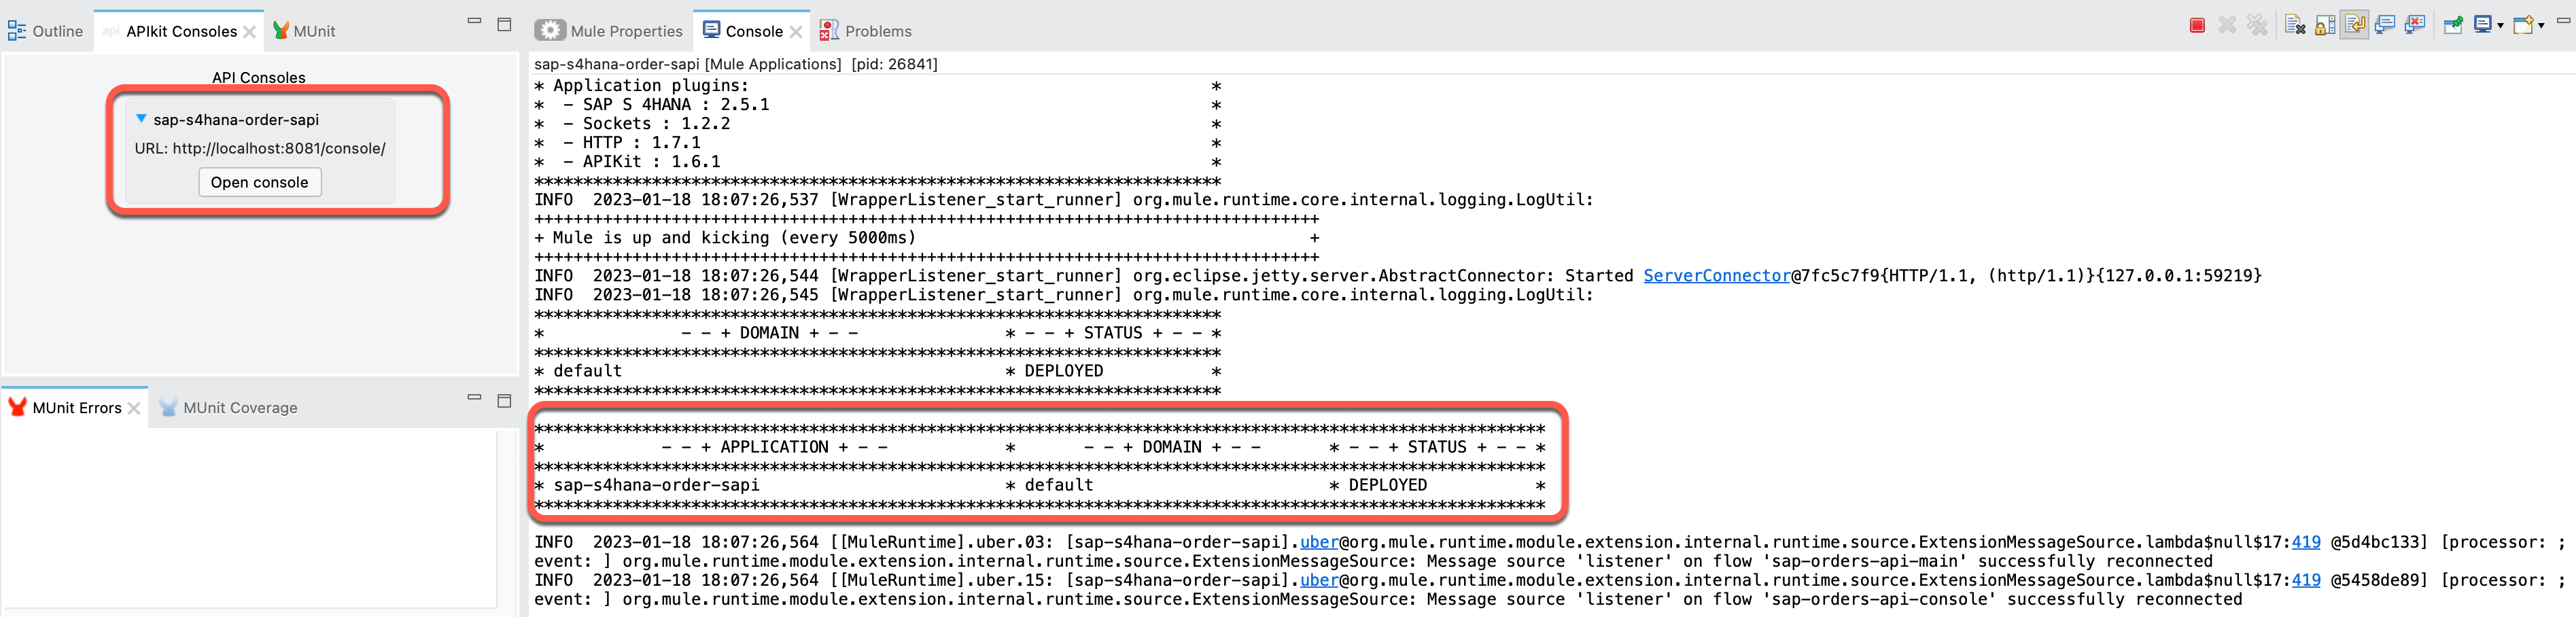
Click on the Open console button under API Consoles.
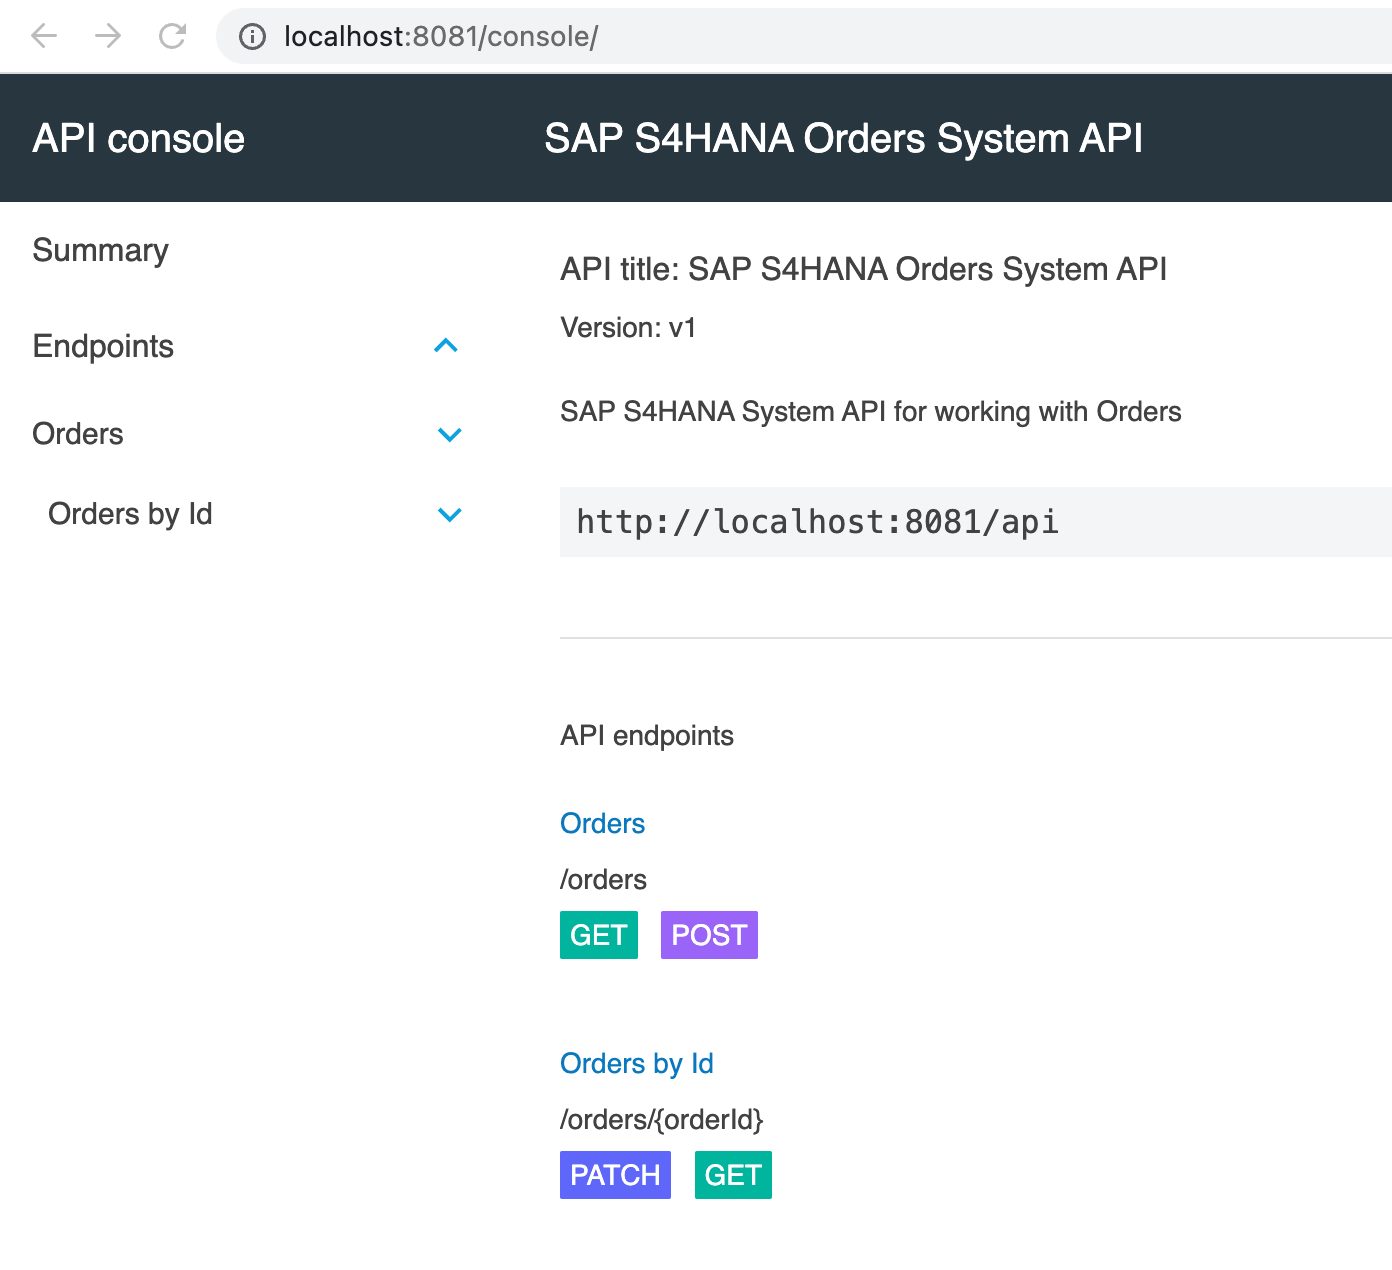
Now let’s test our API implementation.
Click on GET under /orders. Enter the Order ID as below and click Send.

Let’s try the same with POST request.
Click on the Summary button to go back to the API Console homepage.
Click on POST. Note the POST data is already defaulted under the Body. This is coming from the example we had set in the API implementation. We can also change the values if we like, but it has to be in the format presented here. For now let us keep it the same and proceed.
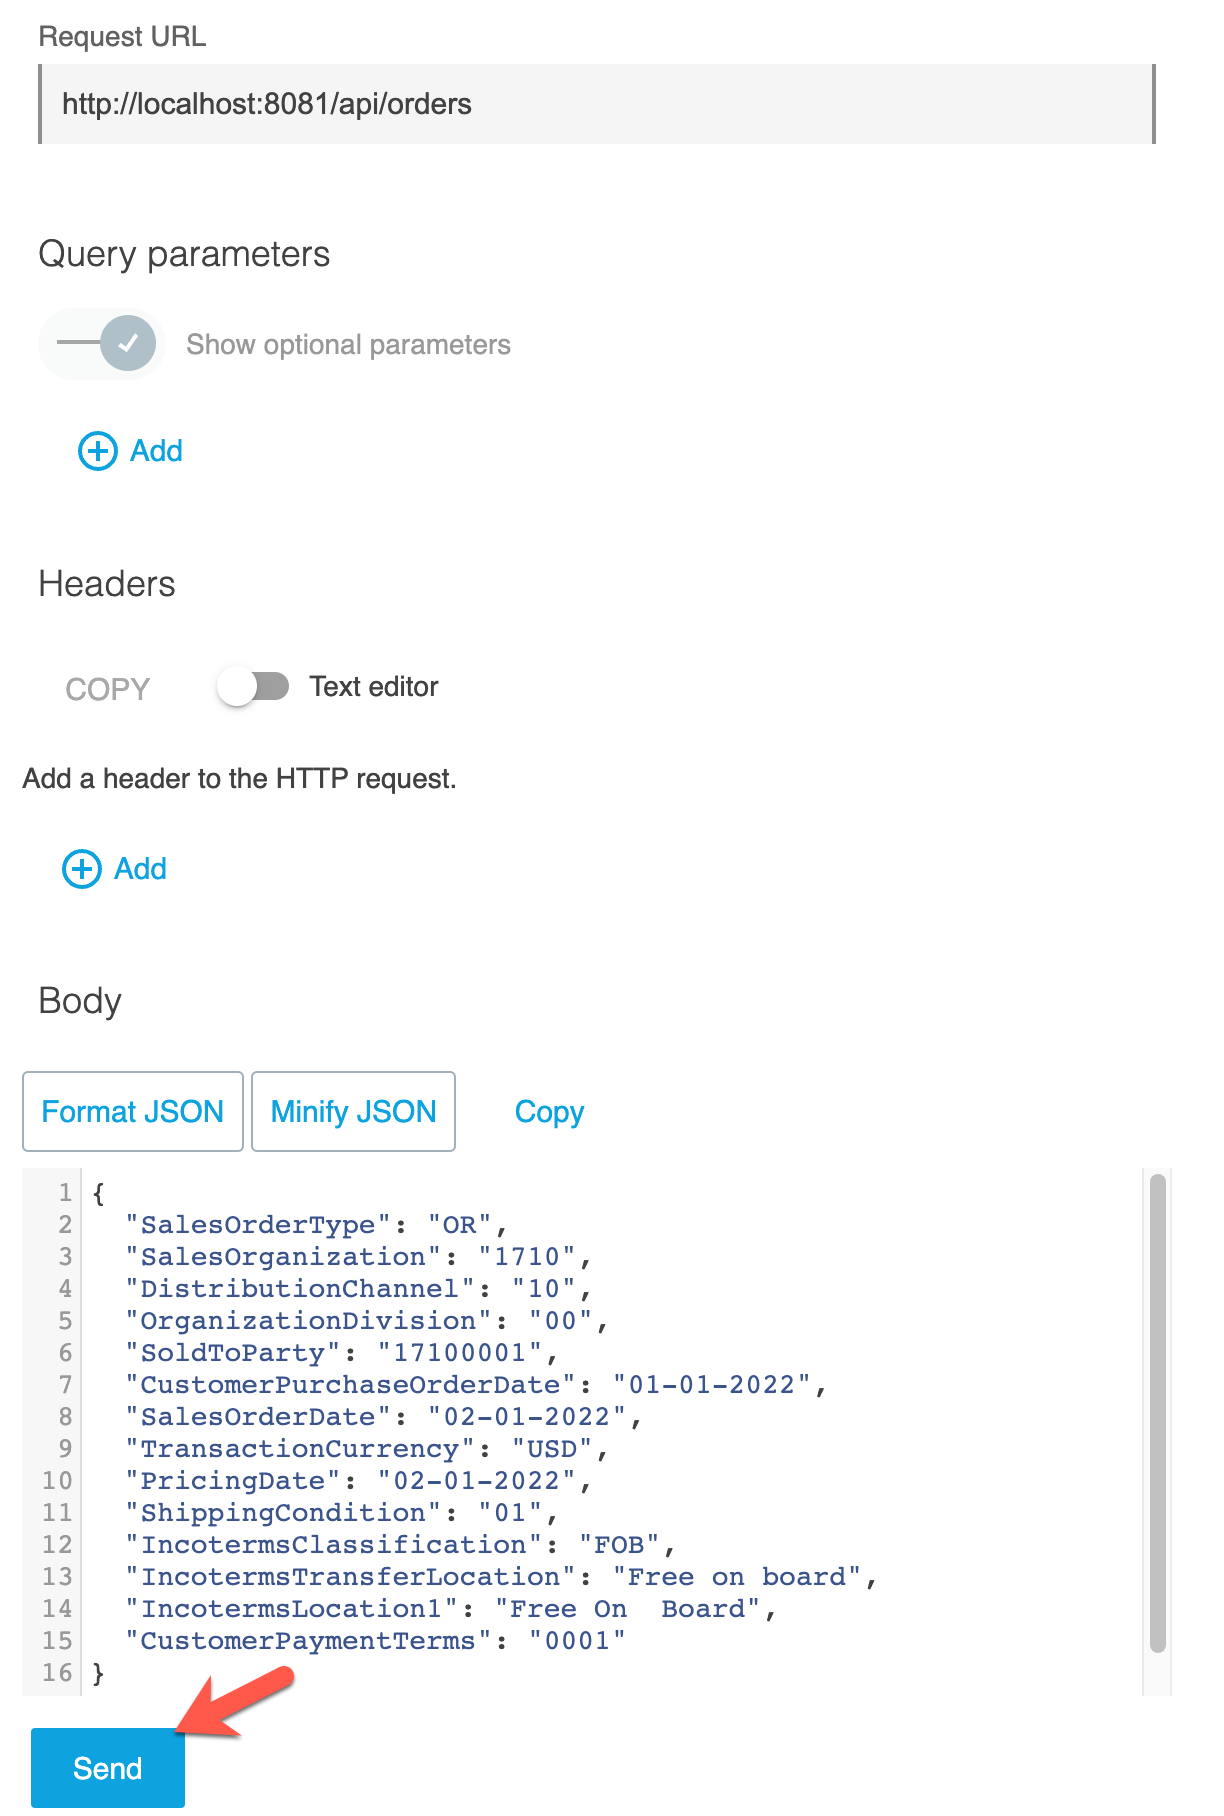
Click on Send
The Order should be created in SAP.
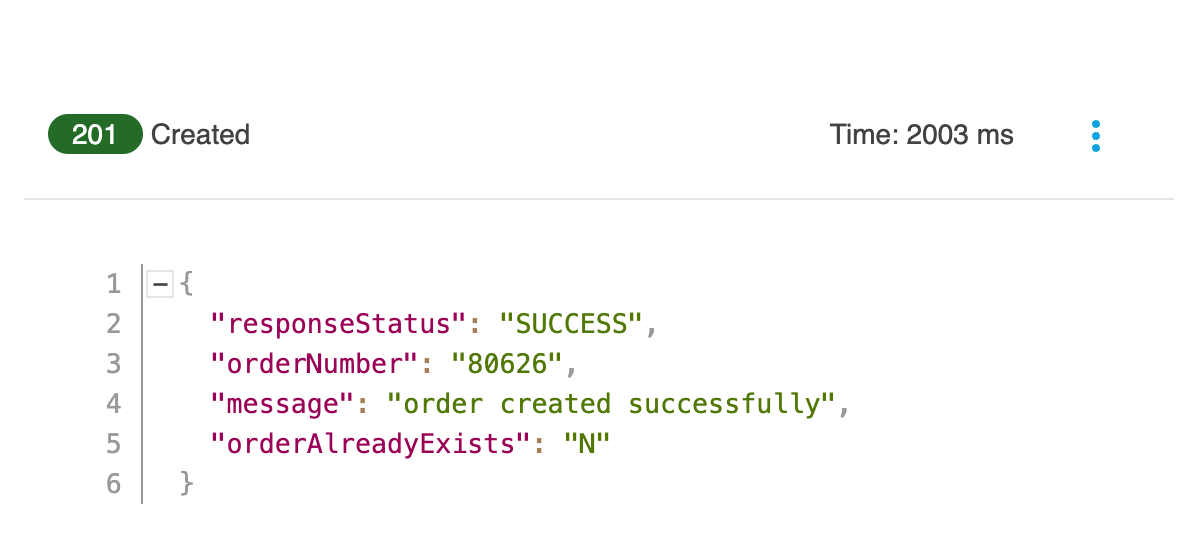
| orderNumber shows the Order Id created in Oracle and responseStatus shows the response. |
Step 4: Deploy API Implementation
Now we are going to deploy the project to CloudHub. First let’s terminate the session. Click on the red box as shown below.

Click on the project.
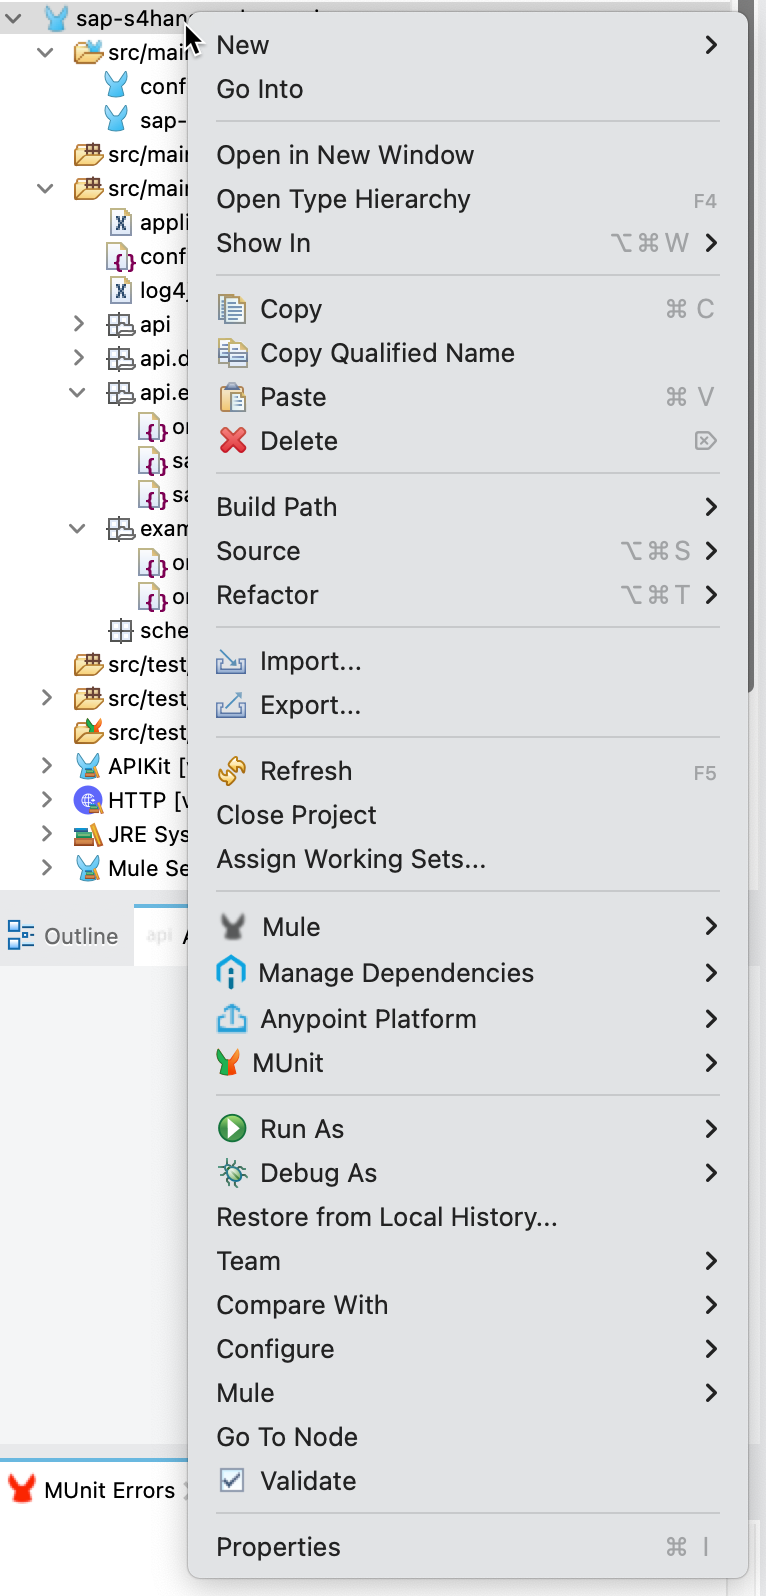
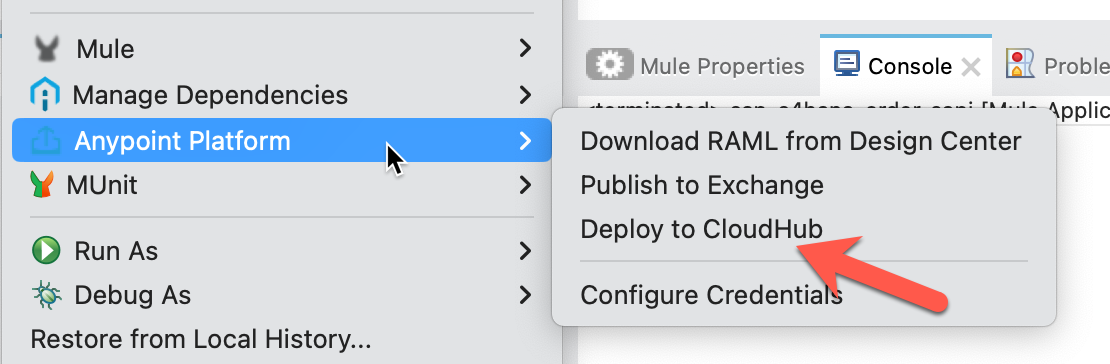
Once the project is selected right-click on the project. Navigate to Anypoint Platform and click on Deploy to CloudHub
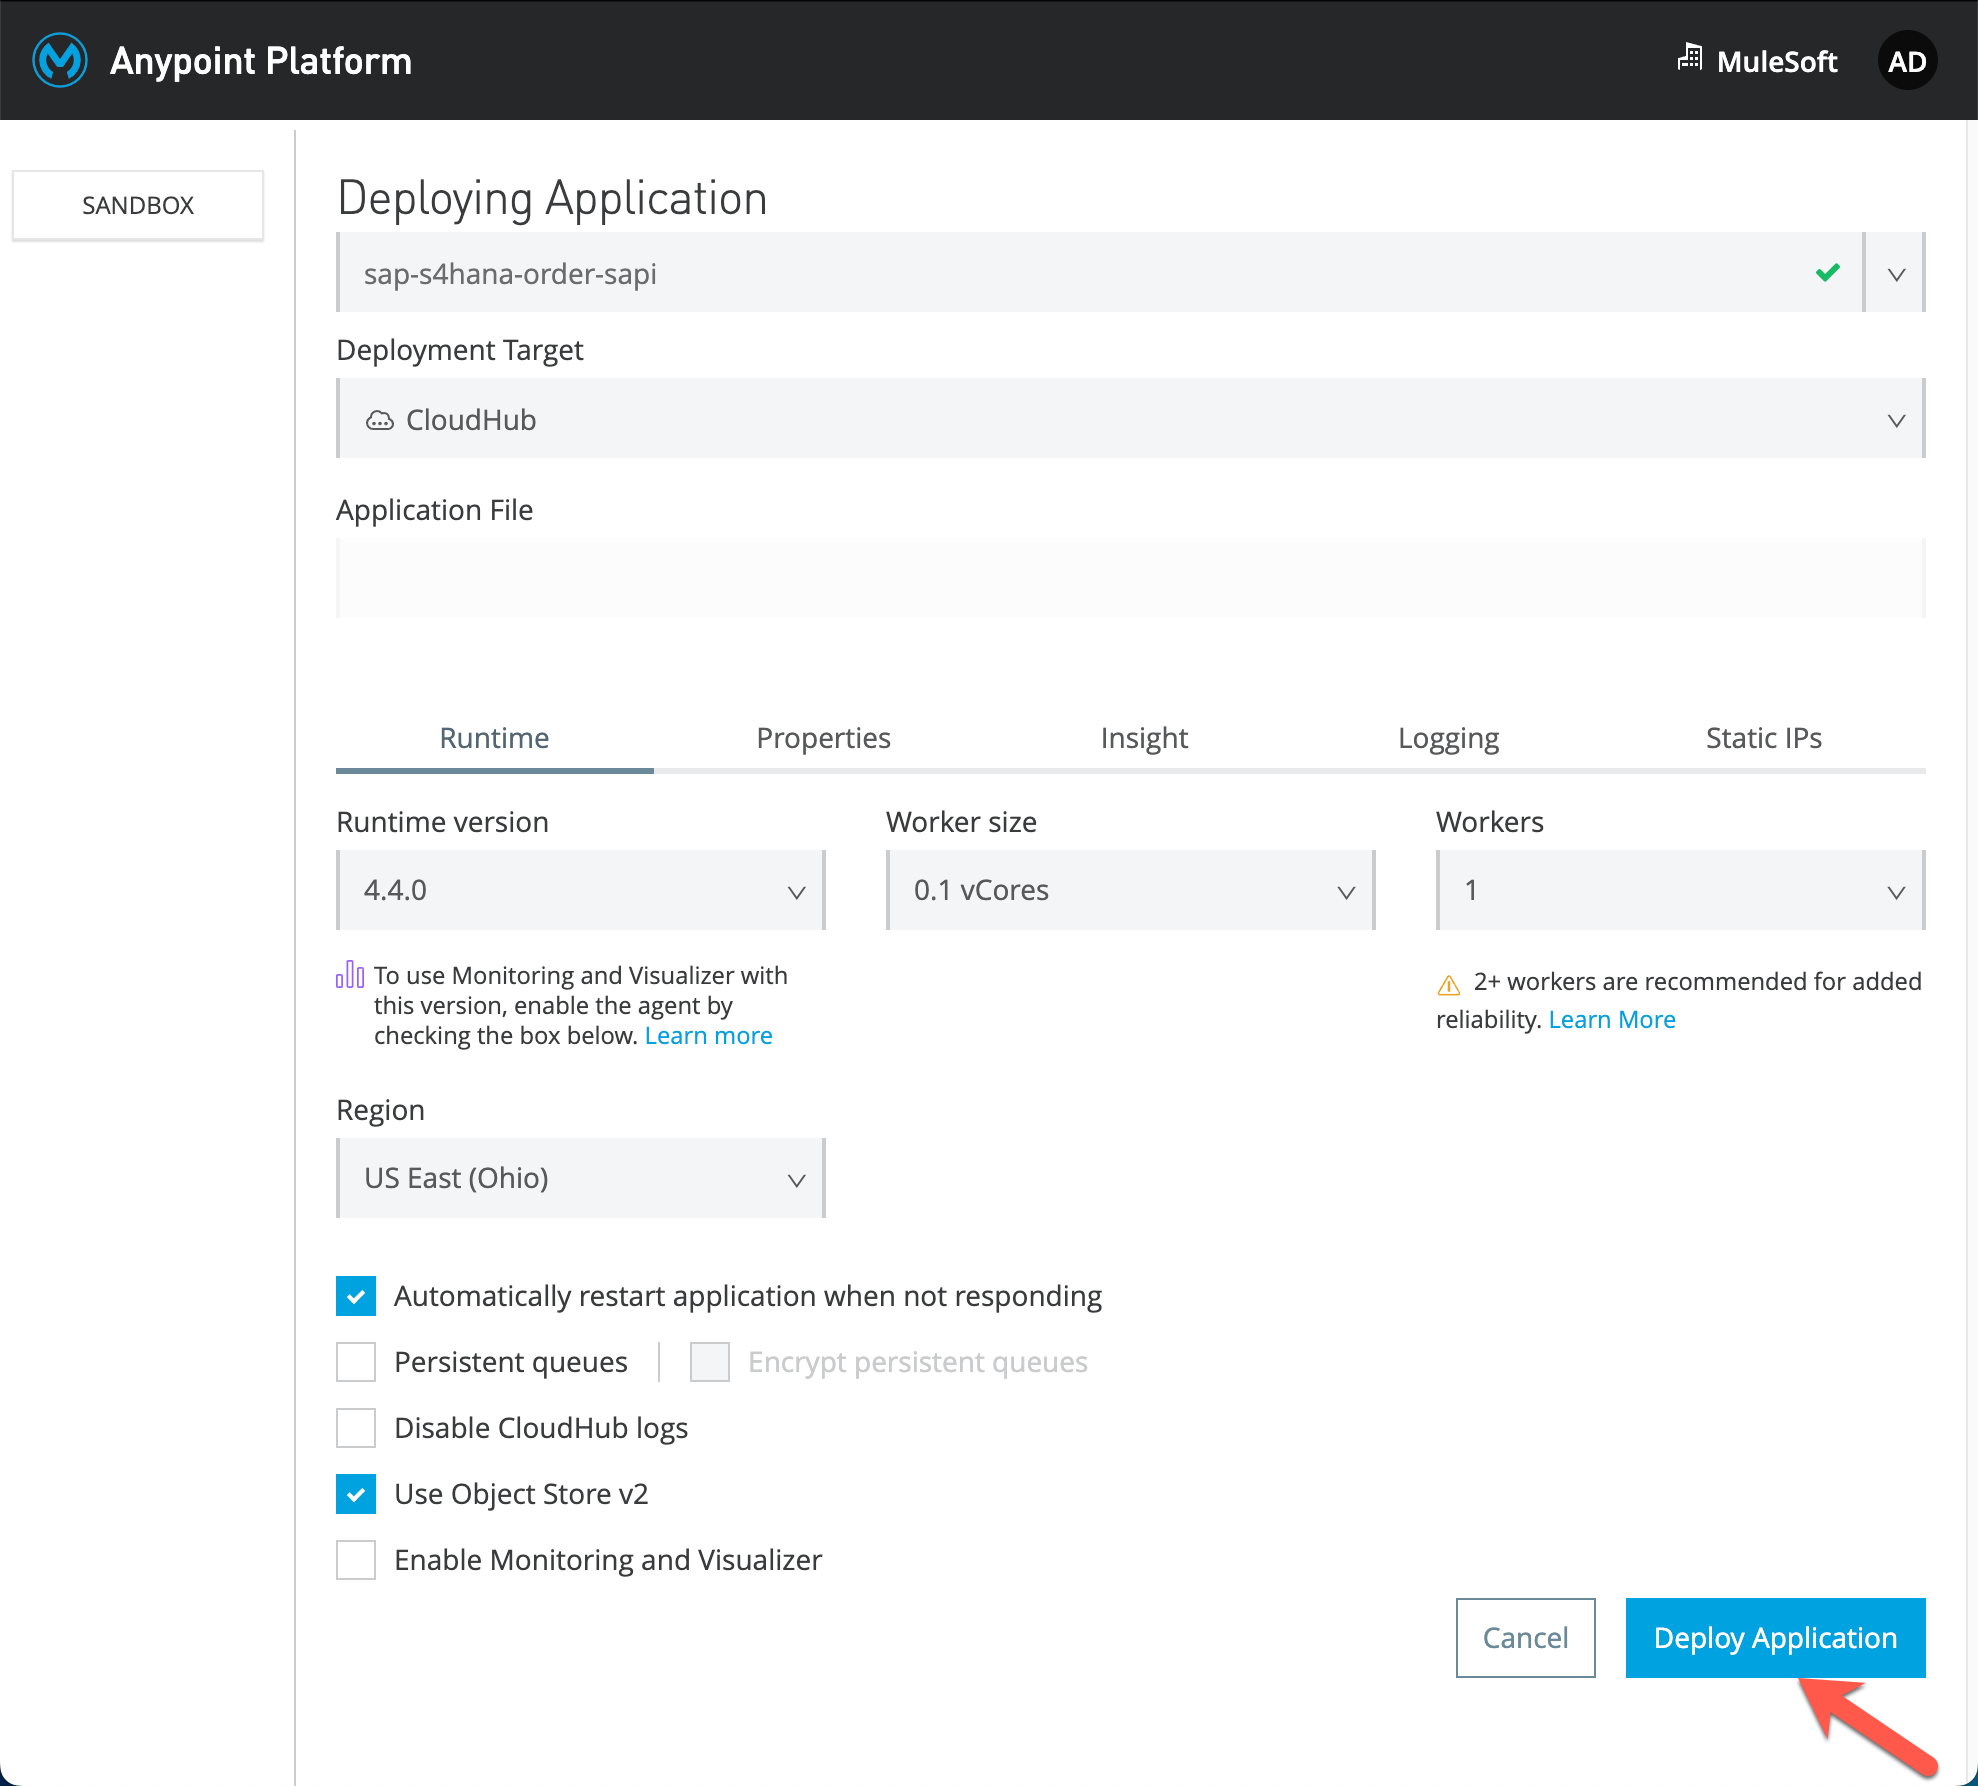
It will open up a new page and enter a unique value that can be used to deploy on CloudHub. Select Deployment Target as CloudHub and enter the application name as <Anypoint Login Id/your initials>-sap-s4hana-order-sapi. Keep rest of the settings as default. Click on Deploy Application
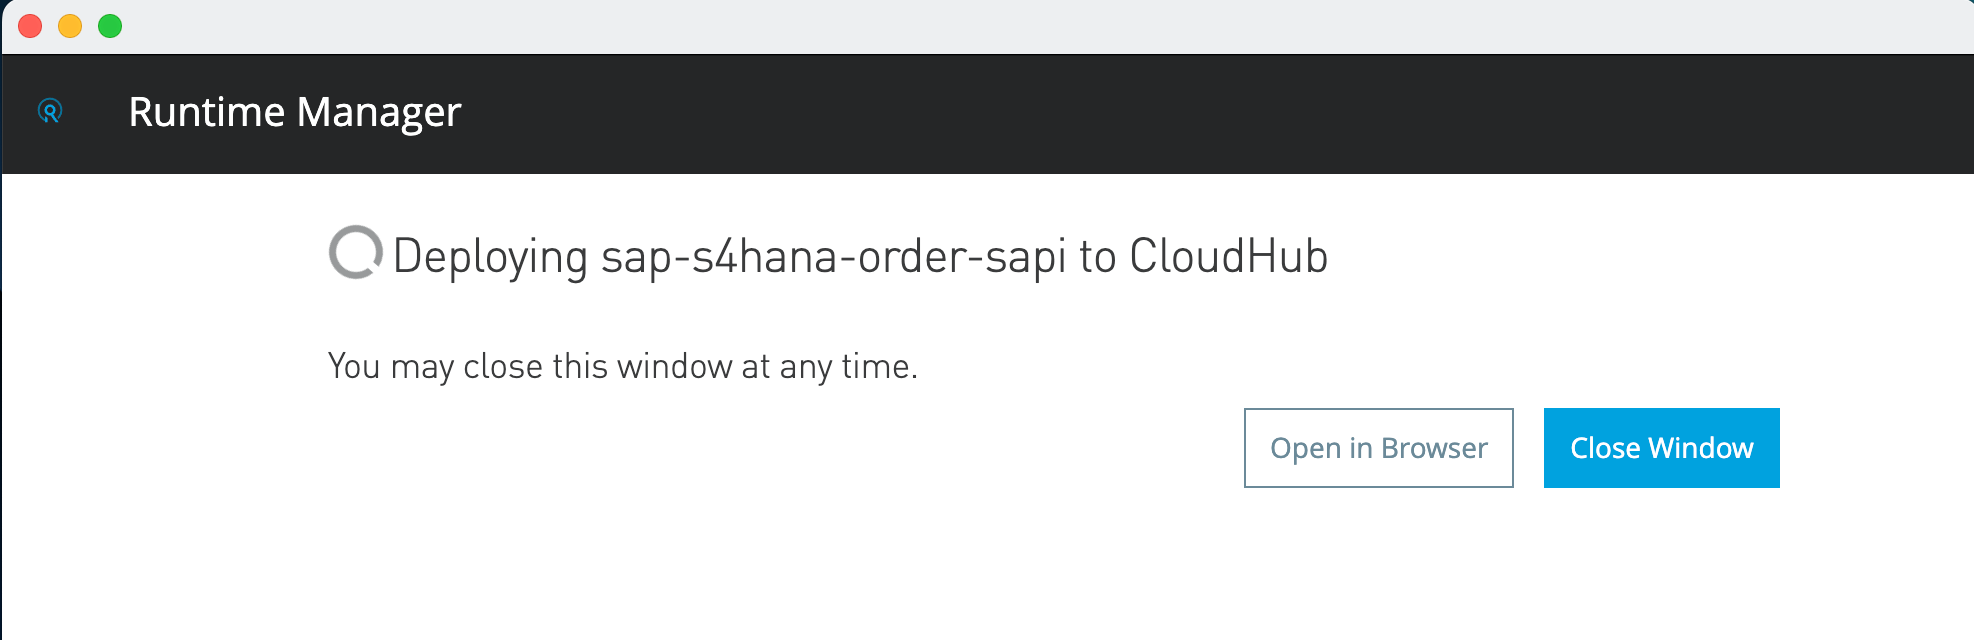
| Do not close the window until the option to close appears |
Once the application is deployed it will ask an option to close window. You can click on Open in Browser. It will re-direct you to the Runtime Manager page. If it asks for credentials please enter your Anypoint Platform credentials you used to login earlier in the workshop.
You are re-directed to the Runtime Manager page. You can have a look at the various parameters of the page or you can click on Applications in order to see the list of all applications deployed in CloudHub.

We just saw the complete build, implementation and deployment of an API.
The flow is now ready. With only two components and just a little effort we have quickly unlocked data from SAP S/4HANA to allows users to easily retrieve order data with its details.
Summary
You now have a more in depth understanding of the various APIs that are a part of this workshop. Some of the key points to remember are:
-
By adhering to an API Led approach to building out your Application Network you can foster reuse of existing assets, which will in turn improve the speed of delivering new features and enhancements to your organization.
-
By using REST interfaces and MuleSoft Connectors you can easily upgrade or replace back end systems without having to revisit all of the APIs that are in your Application Network.